Quantcast
Channel: Neil Parkhurst's Groups Activities
Viewing all 1692 articles
Browse latest View live

MB 600: Microsoft Dynamics 365 + Power Platform Solution Architect – Support Go-Live

$
0
0

I am currently preparing to take the Microsoft Dynamics 365 + Power Platform Solution Architect certification. Or “MB 600” for short! As I prepare I plan to write revision notes in this post I will cover Support Go-Live.

Note: Microsoft have recently updated some of their terminology. Therefore we should consider the terms like CDS and Dataverse as interchangeable. For the exam I would expect them to begin using the term DataVerse at some point but that change is unlikely to be immediate. Meaning in the short term either term could be used. I created this blog post before the revised terms were announced. I have tried to apply updates but a few “outdated” references may still exist!


In an ideal world there wouldn’t be a support need for a perfectly architected solution! The reality is support is always needed after an implementation. The Solution Architect should be an active participant in the planning of post go-live support and the transition from “project mode” into business as usual.

Post go-live we would typically expect the role of the Solution Architect to be diminished. As on a day-to-day basis the Architect is unlikely to have an involvement. Although often I’ve seen a heighted period of support immediately after the initial production release, I think we can reasonable expect the Solution Architect to remain closely involved during this early period. Often this will involve helping progress any bugs or minor enhancements required post go-live. The Architect may also need to review various reports on system usage, network telemetry, storage capacity and much more. This will help them understand that the solution is being used as expected and is also performing in an optimal way.

This continued involvement of the Solution Architect post go-live helps ensure the team stays engaged as they need to stay involved until the “very end” to ensure success.

Microsoft Release Process

In addition to considering the customer’s release / deployment approach the Solution Architect will need to be aware of Microsoft’s release cadence /approach.

There are different types of releases that Microsoft might make to the Power Platform and Dynamics 365.

  • Quick Fix Engineering (QFE) / Patches– in response to major issues or security risks Microsoft can make deployments worldwide within hours.
  • Weekly patches– bug fixes, performance enhancements, stability improvements (etc) are pushed out on a weekly basis. These weekly updates could include new admin features or user facing customizations which you must opt into. But they wouldn’t typically include changes which are user facing by default.
  • Twice annual release waves– Starting in April and October major changes which are user facing will be include in release waves. The release notes for these updates are published four months in advance of the wave starting. And you can “test drive” the changes two months prior to the release.

In line with the annual releases Microsoft publish roadmap details in release plan documents. The Solution Architect should be aware of what is on the roadmap that could impact the solution architecture. It maybe new features should be evaluated and decisions taken on when best to adopt the new capabilities. Often Microsoft release new features in a preview state, when this happens it maybe useful to evaluate the feature but until the full release version is available it is not recommended preview features are used for production purposes. (As they are likely to be changed or removed!)

Additionally, importantly along with each release wave Microsoft may announce feature deprecations. Typically when this happens the feature in question is still available but will no longer receive any updates and will potentially be completely removed from the Power Platform / Dynamics 365 in the fullness of time. The Solution Architect should therefore confirm no deprecated features are being used and when in use plan for their replacement.

Finally the Solution Architect should be mindful not to include any unsupported customizations. As doing this will ensure the fast paced updates from Microsoft do not adversely impact the solution.

Another topic the Solution Architect should monitor is how the customer’s licenses maybe impacted by feature deprecations or the bi-annual release waves. As it is not uncommon for new features to need new licenses!

Facilitate risk reduction of performance items

Often the activities involved in testing and go live preparation will come towards the end of the project life cycle but I suggest it might be important to understand that testing and readiness does not have to wait until the end of a project. Continuous testing can be used to keep all stake holders informed on solution quality and readiness, this can in turn improve your chance of success and lead to a smoother handover from “project mode” into business as usual.

Additionally post go-live it will be important to monitor the performance of applications.

For example reviewing the performance of your canvas apps should be an ongoing effort, you may (for example) be able to off load “work” completed in the canvas app into a Power Automate. And therefore create a more responsive UI. You may be able to use test studio to create repeatable tests for your canvas apps. This will allow regression testing and become an important part of your software development life cycle (SDLC). Test studio is a pretty new tool to help validate that canvas apps work as expected, you can read about it here.

The Solution Architect will help the customer understand the readiness of the system and any associated risks of known issues. In doing this they will help guide the customer towards an informed go live decision. Often the Solution Architect will know the system better than anyone so an informed risk assessment of the systems readiness is something the Architect is well placed to perform. They should know better than anyone what could break, what might not work as designed and what actions can be taken if the system goes down.

Troubleshoot data migration

During the testing phase, data migration should have been tested and the resulting data checked for completeness and accuracy. Repeating these tests multiple times should help ensure the final go-live migration operates as smoothly as possible.

With large implementations it may not be physically possible to migrate all of the historic data on day one. Therefore data migration plans maybe needed to prioritize which data gets imported first.

Review and advise in deployment planning

The Solution Architect will typically be part of the delivery team that will have been put in place to build and test the solution. It will be the Architects role to help build this team and validate any development and testing plans. During the implementation phase the solution architect will become key in triaging any development problems.

Creating a deployment plan is essential in ensuring all go live steps are completed and sequenced correctly. The Solution Architect may not be the person who actually creates the deployment plan but the Architect should expect to provide input into the plan and act as a reviewer.

The architect should whenever possible support the deployment process by identifying risks and help form a “plan B”. The Solution Architect is the “champion of the solution” and may often be the first port of call when the customer is unhappy with progress during deployment.

Some common go live problems (to be avoided) may include;

  • No roll back plan– if the deployment goes bad what are we going to do? Can we roll back? (And has that roll back been tested?)
  • Not enough testing– testing maybe very comprehensive but have you done enough real-world testing? Do the customizations really meet the users needs and does the system perform as expected with real user / data volumes?
  • Outstanding defects not evaluated– perfection is rare but have any outstanding issues been properly evaluated. Is the impact of fixing now compared to post go live fully understood?
  • Incorrect environment assumptions– avoid incorrect assumptions about end user workstations or network configurations.

The Architect should review deployment plans and seek out ways to streamline and simplify the plan. For example, can some of the data be migrated early or can we pre-deploy our mobile apps etc.

Additionally have all user logins been created, appropriate licenses assigned and do they all have the correct roles in the Dataverse (CDS). If possible get all users to access a dummy productions environment to help spot any issues early.

It may be the case that you have to deploy the new application as a “big bang”. But if possible consider if the old system can be run in parallel to the new. Meaning can we slowly move users over to the new system in a controlled manner. Or if a “big bang” is the only option then the Solution Architect may need to advise on the level of risk involved in this process.

Automate the go live

Consider how much of the go live deployment process can be automated. As an automated process is less likely to fail and is also more testable prior to the actual go live.

You may, for example be able to automate the creation is users, teams, business units. Or you may be able to automate the import / creation of reference data. (Microsoft’s configuration migration tool may assist with this.)

But if you do use any automations during the go live process take care to ensure they are well tested.

With or without automations it is essential to have a go-live check list and a timeline. Plus test this check list! Does it include everything and are the timings achievable / realistic. And have we allowed sufficient contingency for any issues that could crop up.

Review and advise with Go-Live Assessment

It may be true that the Solution Architect will be involved in any go / no-go decisions.

Often we may envisage that a solution will be perfect by the time of go-live. In reality this is rarely the case! It will be likely that the Solution Architect may need to help communicate details of any known issues that will be present at go-live. The Architect maybe called upon to evaluate the impact of fixing any outstanding issues now or once live. (In my experience fixing some issues post go live can be much more costly.)

Documentation at go-live maybe critical to ensure decisions, agreements, tasks and assumptions aren’t forgotten. A quick agreement reached in the hallway can quickly be forgotten! Any consents reached with the customer should be documented.

Plus any suggestions / recommendations made should be recorded, especially if the customer rejects a recommendation. You want to avoid someone incorrectly saying afterwards “why didn’t you tell us that??”.

Once the system is live the Solution Architect is often the first person who gets called when problems arise. They can help triage problems and isolate the root cause. In resolving go-live issues the Architect must consider the immediate impacts as well as the longer term. Can we mitigate the issue now with a “quick fix” whilst also considering a longer term solution to avoid future reoccurrences?


Omnichannel for Customer Service – WhatsApp

$
0
0

Microsoft’s Omnichannel for Customer Service supports the WhatsApp channel, in this post I will explain how I configured this to work in my environment.

WhatsApp is obviously a widely adopted social channel with many customers favouring engaging with businesses using WhatsApp. The WhatsApp feature of Omnichannel for Customer service supports WhatsApp integration via Twilio.

You might need to appreciate WhatsApp message types and the 24 hour rule … as this is slightly different to some social platforms. We have two types of WhatsApp messages. Template messages and Session messages.

Template messages are outbound messages, these are transactional messages with a pre-approved format. (For example: “Your order has been dispatched”.) They can only be sent to users who have opted to receive messages from your organization. In this post I am going to concentrate on incoming messages! I might return to more detail around outbound / transactional messages in a later post. (As we can now send outbound SMS and WhatsApp messages!)

Session messages are messages that are incoming messages from a customer. The session would include the incoming messages and any subsequent outgoing replies. Sessions last for a maximum of 24 hours from the most recently received incoming message. Therefore WhatsApp conversations, unlike say SMS conversations only last for 24 hours and cannot continue over several days (or weeks) as could happen with SMS. Outside of the 24 hours, for an agent to re-engage with a customer they’d need to send a template message.

Prerequisites

As WhatsApp integration is delivered using Twilio we first need a Twilio account and number. I explain how to setup a Twilio account and configure the SMS channel in this post.

Note: Currently Microsoft only support US Twilio phone numbers.

Now before you think about configuring the WhatsApp channel it makes sense to check that you are on the latest version of Omnichannel. Below you can see that in the Dynamics 365 administration center I checked that my sandbox was up to date. It wasn’t! So my first step was to apply the upgrade. Applying an upgrade can be a lengthy process. So whilst that happened I had plenty of time to read up on the install process. You can find Microsoft’s documentation on the WhatsApp channel here.

WhatsApp channel Setup steps ….

  1. Connect Twilio number to WhatsApp
  2. Copy Twilio Details
  3. Create WhatsApp Channel
  4. Add WhatsApp number into Omnichannel
  5. Validate your setup

Step One – Connect Twilio Number to WhatsApp

If you haven’t done so already your first step will be to connect your Twilio account to WhatsApp. The steps involved in connecting Twilio to WhatsApp are;

  1. Request access to enable your Twilio numbers for WhatsApp
  2. Submit a WhatsApp sender request to the Twilio console
  3. Approve Twilio messages on your behalf in the Facebook Business Manager console.
  4. Submit your Facebook Business Manager account for Business Verification
  5. Twilio completes your WhatsApp sender registration.

Simples!! Confused? You can read about this process in detail here.

Note:
You will need a Facebook Business Manager ID to be able to request authorizing Twilio/ If you don’t have a Facebook business manager account already you can use this link to create one!

I won’t describe each of the above steps in massive detail. (The link I have provided does that!) But I will give some pointers.

Once I had created a Facebook business manager submitting the request to enable my numbers was simple enough. But you do have to wait for an email to arrive. That took a few days. And in my case I did have to create a support ticket with Twilio! But they did help me out pretty quickly.

After successfully completing step one and requesting your number is enabled for WhatsApp you should receive an email giving you the next steps. (Which involves starting the process to setup a WhatsApp sender in Twilio.) The steps are easy to follow! But I did notice the comment below in my pre-approval email. This isn’t a quick process!!

Once you have the pre-approval email from Twilio you are ready to enable a WhatsApp sender. For this you open the programmable messaging section in your Twilio portal. Here you will find a WhatsApp senders section. After I requested that my Twilio number be added as a WhatsApp sender I needed to wait again for approval.

Next you will get another email from Twilio. This time you need to approve messages being sent on behalf of WhatsApp. You can see below that you complete this approval in your Facebook business account.


At the same time you will need to ensure that your business is verified with Facebook.


This process of business verification and connecting Twilio can be lengthy! I really wanted to say the process was straight forward but I actually needed several support tickets with Twilio. I also ended up completing the business verification with Facebook several times. (Maybe the documents I supplied to verify my business address weren’t ideal!)

Eventually WhatsApp was correctly setup in Twilio …. you can see below that under programmable messaging my number has been approved by WhatsApp.

Step Two – Copy Twilio Details

As you set up the WhatsApp channel in Omnichannel for Customer Service you will need your Twilio Account SID and Auth token. These can be found on the first page of your dashboard in the Twilio account portal. (As shown below.)

Step Three – Create WhatsApp Channel

You are now ready to create the WhatsApp channel in Omnichannel for Customer Service. In the Omnichannel Administration app find the WhatsApp option in the channels section and use the “New” button to create a WhatsApp channel.

Toi create your WhatsApp channel you will need to give the channel a name and then enter your Twilio account SID and Auth token. (copied in previous step!)

Once you click save a Twilio inbound URL will be generated.

Now you need to return to your Twilio console. And in the WhatsApp senders option enter the Twilio inbound URL. (Your Twilio number must be approved as a WhatsApp sender before attempting this step!)

Below you can see that I have entered by Twilio inbound url into my WhatsApp sender within the Twilio portal.

Step Four – Add WhatsApp number into Omnichannel

In your WhatsApp channel you can now enter your WhatsApp phone number.

Below you can see that I’d sued the “+ New WhatsApp number” within my WhatsApp channel in the Omnichannel Administration app.

Below you can see the details for my phone number. Notice I have selected the WhatsApp workstream. (In which I will have also defined any routing rules that I needed.)

I also navigated to the general settings tba and enabled the file attachments options. These are optional but I guess you will probably want to support swapping attachments with your customers.

Step Five – Validate your setup

Your final step is to validate your setup. Below you can see that I used the validate option in the Validation section of my WhatsApp channel.

Test

Finally in my WhatsApp mobile app I created a new contact including the phone number I’d created. And when I sent a message into this account I received the expected notification within Omnichannel for Customer Service

Accepting the conversation allowed the conversation to begin in Omnichannel. And as I’d set the option to enable file attachments these could be sent within the conversation.

Conclusion

The setup process for the WhatsApp channel was not easy! But to be fair all of my challenges seemed to be connected with authorising my Twilio phone number for use with WhatsApp.

Once the process to approve my Twilio number for WhatsApp was completed making the number operate within Omnichannel for Customer Service was a pretty quick and easy process.

I can now receive inbound conversations from customers using WhatsApp. Next it is likely that I will also want to start outbound conversations with my customers. For that I will need some approved outbound WhatsApp message templates. I will dig into the process for configuring outbound WhatsApp messages in a future post!

Omnichannel for Customer Service – Outbound Messages (SMS)

$
0
0

We now have the capability in Microsoft’s Omnichannel for Customer service to commence outbound conversations with our customers using SMS, WhatsApp and Twitter. In this post I will give an example of how we’d configure an outbound SMS. (In later posts I plan to cover WhatsApp and Twitter.)

You can read all about the outbound capabilities in Microsoft’s documentation here.

The overall concept is that we create an outbound message template, enable outbound messaging on a given channel and then create a Power Automate Flow that will send the message. Plus the message template can include dynamics values which can be provided by the Flow, an approach that allows us to personalize the outbound message.

When describing a feature I tend to like to show an actual example of how I’ve configured it. The Microsoft documentation describes a common scenario of sending a message when a case is created or resolved. They even include example Power Automates that you can download and amend. These will be common uses of outbound messages and I do suggest you review their examples.

In the interest of showing something different I have decided to use a different example … this will be based on a proof of concept I created for a real scenario!

My use case was a little different! I wanted to generate an SMS to someone when a conversation request arrived into Omnichannel. Why??? …. Well in my scenario we wanted to alert someone with that a fresh conversation had started. Maybe you have someone on out of hours support who needs to monitor incoming conversations on a particular channel. If the volumes are low we can’t expect them to be glued to the screen 24/7, so having a “nudge” from an SMS might be useful.

This does mean that my example is a little more specific than those mentioned in the Microsoft documentation. But actually the steps involved are pretty much the same. Those being;

  1. Create a message template
  2. Configure outbound messaging
  3. Create a Power Automate to send the message

Tip: If a customer receives an outbound message. If / when they reply to that message they’d effectively commence an inbound conversation with one of your agents. Imagine, for example, that you send them an outbound message saying “Your delivery will be at 10am tomorrow”. They could reply explaining they wouldn’t be at home tomorrow etc. So my tip is, when considering outbound messages you might want to consider the full customer journey. As the outbound message may just be the start of the conversation with your customer.

Step One – Create a message template

Below you can see that I have opened my Omnichannel Administration app and within this located the messaging templates option. Within here you will see any existing templates, which you can amend. Or you can use the “+ New” option to create new templates.


Below you can see my example message template. It is a pretty simple message!

All I have done is given my template a name and picked the channel. SMS, in this example.

Next I enter the text for my message. Notice that I have entered “{Myname}”. Anything between the brackets will be substituted for dynamic information by my Power Automate. We’ll see how that works later in this post!

Tip:
My example is pretty simple in that I am only going to send the message in English. Notice that I could create multiple versions of the message with localised text if I wanted to implement to multiple languages.

Step Two – Configure Outbound Messaging

Now I have my outbound template I am ready to configure my outbound channel to use that template. Below you can see that in the Omnichannel Administration app I have located the “Outbound” option. Within this we can see my existing outbound configurations. You can edit those from here or use the “+ New” option to create a new one.

I actually have two providers of SMS defined! Telesign and Twilio. So in my example I have created both as I wanted to test working with either of my two SMS numbers. But each of these will leverage the same outbound template. Hopefully you can see that this gives you flexibility if you happen to have multiple SMS numbers defined. (Or WhatsApp and Twitter accounts if you wish to send outbound messages using those channels.

Below I have shown one of my outbound configurations.

Notice the configuration ID. This is generated when I save the configuration. You will need to copy this as we’ll use it within the next step of creating a Power Automate Flow to send the outbound messages.

Also notice that I have selected the SMS channel and also picked which channel I want to use. Plus I have linked this configuration to the message template I created in the first step.

Importantly notice the “show in timeline” option. In my scenario I just wanted to send out the message and didn’t need it to show in the timeline of any related record. So I entered “No”.

In other scenarios you will want to link the outbound message to an associated case or other entity. If you need this enter “Yes”. But having done that you will also need to provide details of the regarding “object” in the Power Automate that we will create in the next step.

Step Three – Create a Power Automate to send the message

Now my Outbound message has been defined I needed to create a Power Automate to send the message. You could trigger the message in many ways … for example when a case is created. But in my example I will trigger the Power Auotmate when a conversation in Omnichannel is created.

I have shown the steps in my Power Automate below. I will then expand on each of these below. At a high level the actions in my Power Automate are as follows;

  1. Conversation (Created)…. As explained my Power Automate is triggered when a conversation is created.
  2. Initialize (ContactList)…. Firstly I initialize an array. At this point it will be blank but later we will add the contact you will receive this message.
  3. Get (NeilParkhurst Contact)… I added this step to query the contact I wanted to send the message. (If you has a case maybe you’d read details for the customer associated to the case!)
  4. Append to array variable… Having queried my contact I add details for the message to my array.
  5. Compose (JSON)… next I format my array as JSON, as required by my next step.
  6. Unbound action (Send SMS)… My final step is to trigger an action to send the SMS.

In the following sections I will detail exactly how I defined each of my Power Automate actions.

Conversation (Created)

My first tile is pretty simple. Here I am simply saying that the Flow is triggered on create of a “Conversation”. In my final production version I may have wanted to use the advanced options to filter which conversation. Or maybe I would have followed this step with a condition to check if I wanted to send the SMS. But this was a simple proof of concept, so I simply trigger my Flow for every conversation that is created.

Initialize (ContactList)

Here I am simply initializing an array variable which will be called “ContactList”. I will use this later in my Flow.

Get(NeilParkhurst Contact)

In this next step I am running a query to get the contact that I want to send the message. (As I need to find their mobile number!)

Again keep in mind that this is a simple proof of concept example. As I have queries the contract directly from the ID of my contact. You will probably want to do something more creative to find the contact or contacts that need to receive this message.

Append to array variable

Here I am adding details of my contact into the array. Specifically I am defining the mobile phone number to use for my message.

Also notice that under context items I have set a variable called “Myname” to the first name of my contact. If you recall in step one I included “Myname” in my message template. Meaning at runtime the contacts name will be inserted into my templte.

I have shown the value for my append action below;

{
"tocontactid": "@{outputs('Get(NeilParkhurst_Contact)')?['body/mobilephone']}",
"channelid": "sms",
"optin": true,
"contextitems": {
"Myname": @{outputs('Get(NeilParkhurst_Contact)')?['body/firstname']}
  }
}

Note:
If earlier you’d selected the option to add the message into the timeline. In this contextitems section you’d need to include the “regardingobjectid” and “entityrealtionshipname” for the regarding table. If you are doing that you might want to review the example in the Microsoft documentation I referenced at the start of this post.

Compose (JSON)

The next action simply composes my array ready for use.

Unbound action (Send SMS)

My final action sends the message. You create an unbound action and enter the name “msdyn_InvokeOutboundAPI”.

Next we add the ID of your outbound configuration. (This is the ID from the outbound configuration which I commented you needed to copy in the previous step!)

You need to add the ID into a field called “msdyn_ocoutboundconfiguration msdyn_ocoutboundconfigurationid”.

Tip: I made an mistake at this point!!! As you can see from the screen shot below the names wrap and I couldn’t easily read the entire name. Therefore you need to be really careful that you assign the ID to the correct field as there are several with very similar names!

My final setting is to add the output from my “Compose (JSON)” action into the ContactList for this unbound action.

Once my Power Automate was turned on I began to receive text messages every time a new conversation arrived into Omnichannel. Honestly, this might not be the best example in the world! But I hope you can see that the overall concept is pretty straight forward and you could amend my idea for many situations.

Meaning the resulting solution is actually very flexible and pretty simple to implement. Enjoy.

Power Platform Birmingham – Amazing Free January Event

$
0
0

Our next exciting Dynamics 365 Birmingham User Group meeting will be taking place on Wednesday 20th Jan 2021 at 5:30pm, and we would love to see you!

We hope to see our local friends. But being virtual EVERYONE will be very welcome!!

NOTE:
We plan to repeat the successful format used at our previous events! Meaning we’ll keep our presentations short and sweet. Plus we’ll kick off just after work at 5:30pm. You will also get a chance at the end of each presentation to ask questions or make comments.

If you haven’t registered yet the event is open to anyone and is free to attend.

You can register on meetup here …

D365UG Birmingham – Wednesday 20th January 2021 5:30pm | Meetup

Agenda

Emma D’Arcy
The Center of Excellence – What you need to know

In this session Emma D’arcy will do a deep dive into the Center of Excellence from what it is, why it’s important, how to implement it and lessons learned from a real world implementation scenario!


Alison Mulligan
Your career is your responsibility

Alison Mulligan will present … Why it is important for you to build your own career development strategy, and how to get started on yours.

Alison’s presentation will be a short one! But afterwards you’ll be able to stay and discuss your career thoughts with Alison. So come armed with questions!!! What better time than early in the New Year to consider your career development???

After the sessions, we hope you’ll stay with us to socialise and share your anecdotes on what you’ve been up to?

If you haven’t registered yet the event is open to anyone and is free to attend.

You can register on meetup here …

D365UG Birmingham – Wednesday 20th January 2021 5:30pm | Meetup

Omnichannel for Customer Service – Insights Dashboards

$
0
0

Within Omnichannel for Customer Service we can enable Power BI based dashboards to give insights into your customer communications across all your messaging channels. In this post I will review how to enable these dashboards and what information your supervisors will then be able to view.

We actually have two types of supervisor dashboards. The first are the intraday statistics. These are refreshed every 15 minutes and shows a snapshot of KPIs relating to recent conversations. We have two intraday insights dashboards, one shows details for conversation totals across all channels and the other gives information which is agent specific. (The agent dashboard can also allow the supervisor to see the current agent presence and even update it directly from the dashboard.)

We also have additional insights dashboards which give a deeper analysis of conversations over a longer period. In this post I will be describing these “historic” insights dashboards. But you may also benefit from looking into the intraday insights. (I might cover those in more detail in a future post!)

Note: You will need a Power BI Pro license to be able to install the Omnichannel Insights app.

You will find Microsoft’s install instructions and full details of additional prerequisites here.

The install steps are as follows;

  1. Ensure embedding Power BI reports in Dynamics 365 customer service is enabled
  2. Enable sentiment reporting
  3. Install Omnichannel Insights for Dynamics 365 app
  4. Connect to Omnichannel Insights app
  5. Set the refresh frequency on your dataset
  6. Publish your application
  7. Add Power BI dashboards to Omnichannel for Customer Service

Note: There are quite a few steps to the setup process. But stick with it as each step is pretty simple, so you shouldn’t have many problems completing this.

Step One – Ensure embedding Power BI reports in Dynamics 365 customer service is enabled

In the power platform admin center, select your instance and then within the settings option open the “Features” option.

Below you can see that my “Power BI Visualization embedding” setting is enabled.

Step Two – Enable sentiment reporting

You need to ensure that “sentiment drivers reporting” is enabled within Omnichannel.

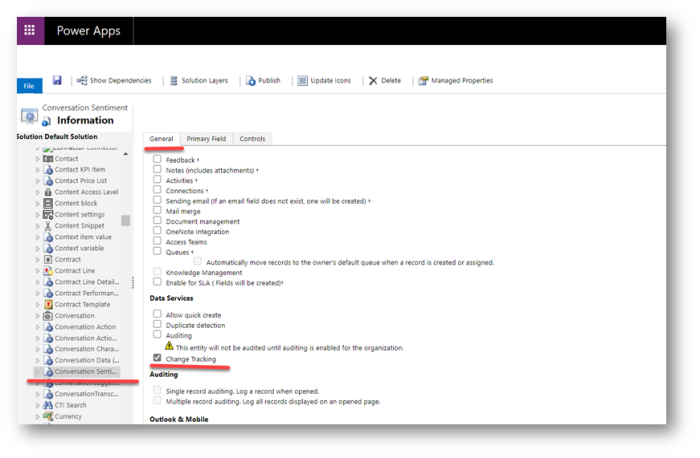
Before doing this also confirm that change tracking is enabled on the conversation sentiment entity. (Note: Mine was enabled already but it is worth checking!)

Below you can see that on the properties tab for the conversation sentiment entity I have change tracking enabled. Don’t forget that it you change this option you’ll need to publish the change!

Then within the Omnichannel Administration app, open the sentiment analysis settings option. In here you will find an option to “report sentiment drivers in Omnichannel Insights”. You will need to confirm this is enabled.

Step Three – Install Omnichannel Insights for Dynamics 365 app

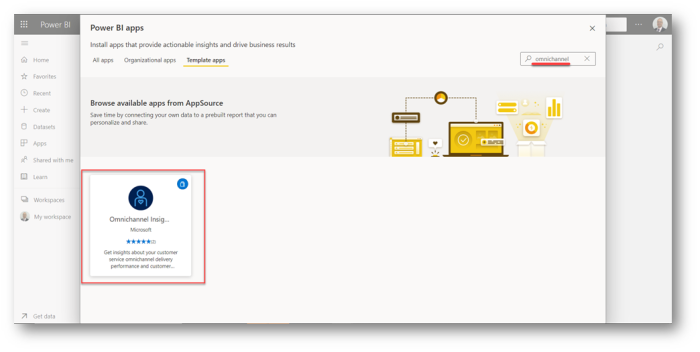
As an administrator open Power BI. Then use the “Get Data” option to choose the Omnichannel insights app.

Below you can see that I have searched for “Omnichannel”. The Omnichannel insights app has been found and I can select it.

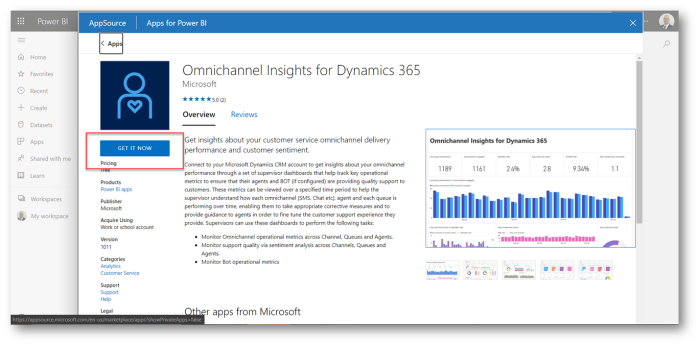
I now open the app and select “GET IT NOW”.

Assuming you are happy to continue that click “Install”

The app will now install. It only takes a few moments!

Once complete you will see the Omnichannel Insights app within Power BI.

Step Four – Connect to Omnichannel Insights app

Now we need to connect the insights app with your Omnichannel for Customer Service instance.

When you first open your Power BI Omnichannel insights app you will see that all the data is blank. Notice the notification which says “You’re viewing this app with sample data”. Click the “connect you data” option next to this message.

Next you enter your Dynamics 365 service root URL and click next.

Tip:
If you don’t know what this URL is check out the customizations option in your advanced settings. And look for the developer resource option as within here you’ll find details about your instance, including this URL.

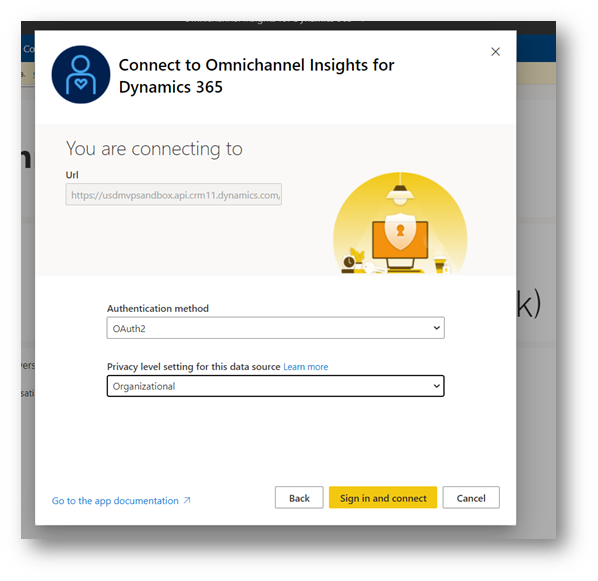
Next I set my privacy level to “Organizational” and clicked sign in and connect.

Step Five – Set the refresh frequency on your dataset

Your next set will be to set the frequency to refresh your data. This is a simple process which allows us to ensure the data is automatically refreshed daily.

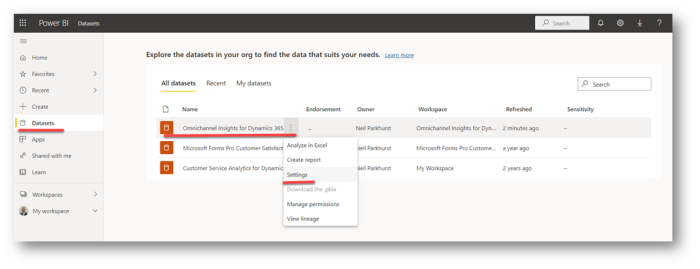
Within Power BI find the datasets option, then on your Omnichannel Insights for Dynamics 365 dataset click “…” and select the settings option.

Within the settings, expand the “schedule refresh” section. And check that the keep you data up to date option is selected and the frequency is set top daily.

Step Six – Publish your application

You must now share the Power BI application with your entire organization, this is required for supervisors to be able to view the Omnichannel Insights dashboards and reports.

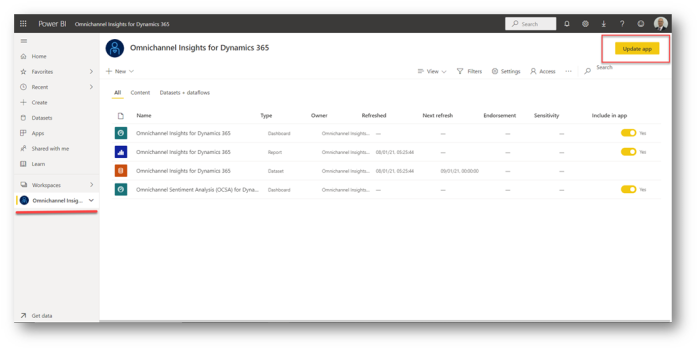
Below you can see that I have selected my app workspace. I then click the “Update app” button.

Finally, navigate to the “Permissions” tab and select the “Entire organization” option. Then click update app.

Step Seven – Add Power BI dashboards to Omnichannel for Customer Service

We are now ready to configure Dynamics 365 so that the supervisors can see the Omnichannel insights and sentiment analysis dashboards.

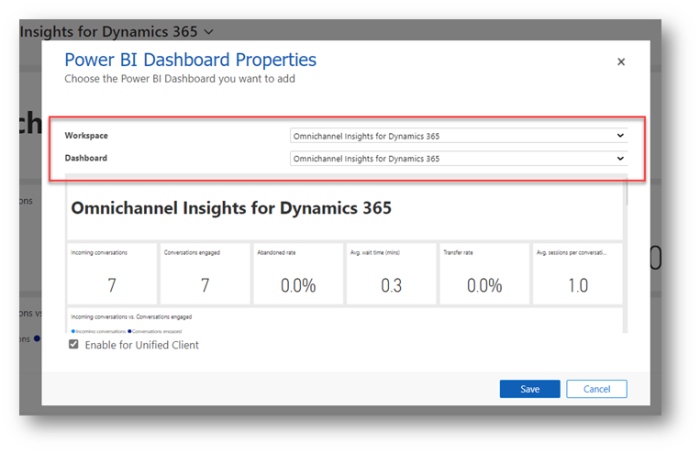
Each supervisor will need to add the sentiment and insights dashboards. Therefore from the dashboards option that will select New and then select Power BI.

Each supervisor can then the omnichannel insights workspace and insights dashboard.

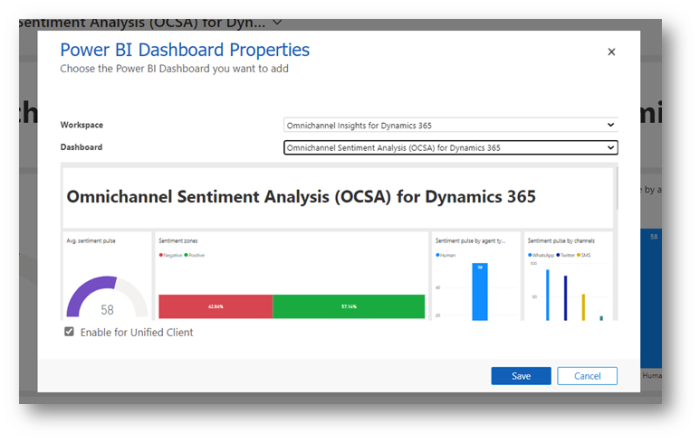
Assuming they require the sentiment dashboard as well as the insights dashboard then they will need to also select the sentiment analysis dashboard.

Once completed the supervisor will have two dashboards that can be selected.

Dashboards

Ok … so now you have two dashboards but what information can you expect to see? In this final section I will describe the key elements of each dashboard. I might not cover everything just the key information!

Obviously the best thing to do is configure the dashboards and see what you actual data look like. But in this section I will try to highlight some of the insights I found most interesting. I will also comment on what actions I completed in my tests to generate this data!

Let’s start by looking at the Insights dashboard ….

Omnichannel Insights for Dynamics 365

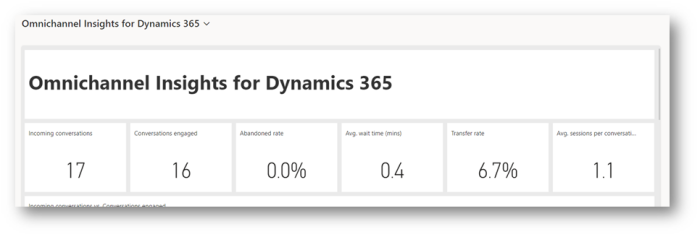
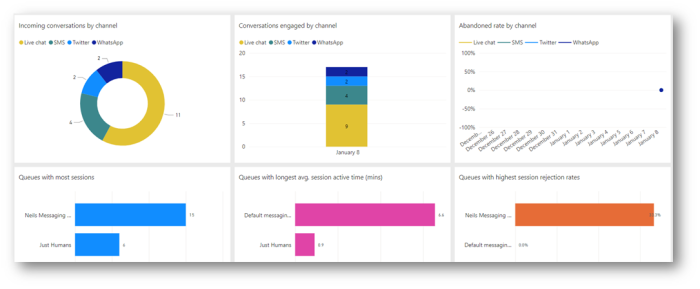
The insights dashboard gives you an overview of activity. The top section of the dashboard contains some useful cards that tell me how many conversations have happened etc.

Notice I have 17 incoming conversations but only 16 have been engaged with. This is because I had one conversation that the customer started but no agents accepted.

As Microsoft’s documentation described the abandon rate is the percentage of conversations that are not engaged by agents I was surprised to see that it initially remained at 0%. I did some further tests when I did see the abandon rate change. I think an abandoned conversation is one that is never routed to an agent. Maybe the customer shuts the chat widget almost immediately or maybe no agents are available so the customer aborts before the conversation can be routed. Whereas conversations that are routed but the agents don’t converse with the customer seem to show in the difference between incoming conversations and engaged conversations. But don’t count as abandoned.

I mention abandon rates as in my experience this is a KPI which the supervisors may wish to keep a close eye on. Therefore understanding its meaning maybe important. An increase in customers abandoning conversations before they connect with an agent might suggest you need more agents!

My average wait time was pretty low as generally speaking I connected with each test customer straight away. And being a test system meant I didn’t have a large volume of live customers engaging concurrently!

I did simulate one agent transferring a conversation to another agent. Hence I have a transfer rate.

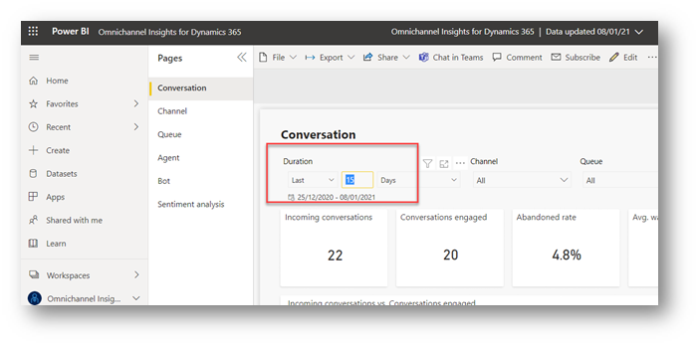
Below these initial tiles I get a chart showing the number of conversations by day for the last 15 days. Plus charts show the average wait timer per day, average length of conversations and transfer rates per day.

One tip I have here is that you might want to open the dashboard up in Power BI directly. As the date range for these charts could be tweaked. (As shown below.)

I also see a useful chart which gives me an average score from my sentiment analysis. Although if you want to dig deeper into sentiment analysis then the sentiment dashboard will give you more information. (I will mention that later in this post.)

I then get a bunch of charts showing me the conversation stats by channel and queue. I found it especially useful to see how many conversations I’d taken on say Twitter compared to WhatsApp. Etc.

Next I see similar information but by agent. In my test I had just two agents. Me and my dog! But I hope you can see that being able to see how many conversations had been taken by each agent could be really useful.

Tip: One agent handling more conversations than another could in theory flag a management concern. But equally it might be highlighting that due to agent skills based routing and capacity you have a tendency to route conversations to particular agents. So these stats may give you some clues on how your Omnichannel routing can be improved. In my example I found my agent had a much higher capacity than any other agent and therefore the conversations were not routed evenly across my agents.

The final group of charts showed me BOT conversations, including details of resolution rates and escalation rates. I think it would be really useful to understand how many BOT conversations get escalated to humans!

Sentiment Analysis Dashboard

Next I looked at the sentiment analysis dashboard. I found this one really interesting!

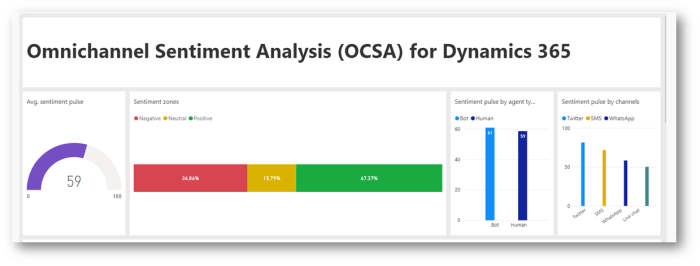
The first tile on the sentiment analysis dashboard shows us the average sentiment pulse we saw this on the omnichannel insights dashboard! But we also have a chart showing the sentiment zones, this gives a sense of what percentage of conversations fall into negative, neutral or positive rankings.

This pulse is then further split down by type of agent (aka human or BOT) and channel. For example, In my test data conversations one Twitter seemed to be more positive than live chat.

I only had a couple of test agents but I next see some charts that show me sentiment scores by agent (for the agents obtaining the lowest and highest scores).

Beyond this I see sentiment by queue and also channel (by day).

I hope you agree that enabling these insights is quite straight forward and we can view loads of useful information about our conversation volumes and sentiment. Enjoy.

Dynamics 365 Birmingham – Awesome Free March 2021 Event

$
0
0


With COVID rules looking likely to be relaxed soon maybe just maybe we can start to dream of meeting face to face again soon. But until then we have another awesome free virtual event.

You can register now on meetup using this link …. D365UG Birmingham – Wednesday 17th March 2021 5:30pm | Meetup

This time we have two MVPs presenting. Danial and Benedikt.

Meaning our next exciting Dynamics 365 “Birmingham! User Group meeting will be taking place on Wednesday 17th March 2021 at 5:30pm, and we would love to have you along!

We hope to see our local friends. But being virtual EVERYONE will be very welcome!!

As always our virtual event will start at 5:30pm, so pretty much straight after work. We will also be planning a short meeting, just a one hour session with focused presentations.

Agenda


Session : Getting started with ALM and Dynamics
Speaker : Benedikt Bergmen (MVP)

In this session, we will learn what ALM is and how a basic ALM process for Dynamics could look like. In addition to that, I will bring everyone on the same level of knowledge when it comes to stuff around ALM, like for example tests, Managed/Unmanaged, Update/Upgrade.

We also will have a look at what is possible to make an ALM process more mature.

Session : Power Automate Desktop 101
Speaker : Daniel_Laskewitz (MVP)

In this session, Daniel will show you how you can start your Robotic Process Automation (RPA) journey in Power Automate. What can you use it for? What’s the difference between attended and unattended? Which scenarios are a great fit for RPA? And which aren’t? How does this compare to Digital Process Automation(DPA) or cloud flows? Next to this, Daniel will also talk a bit about the licensing part of it.
After the sessions, we hope you’ll stay with us to socialise and share your anecdotes on what you’ve been up to?
As we socialise you will get chance to question each of the presenters. And also we’d be happy to discuss any of your questions around Dynamics 365 or the Power Platform.

You can register now on meetup using this link …. D365UG Birmingham – Wednesday 17th March 2021 5:30pm | Meetup

I look forward to “seeing” all of you soon ….

MB-230: Microsoft Dynamics 365 Customer Service – Introduction

$
0
0

I am about to commence my revision for the MB-230 exam. This exam is for Microsoft Dynamics 365 and covers all aspects of customer service. As I revise I plan to publish blog posts that collectively will become a complete revision guide for anyone embarking on the same journey as me.

Who should study to MB-230

Anyone who wishes to gain the “Dynamics 365 Customer Service Functional Consultant Associate” badge will need to pass the MB 230 exam. (In addition to the Power Platform Functional Consultant exam, PL-200).

But why would you want to be a “Dynamics 365 Customer Service Functional Consultant Associate”? (Catchy name!!) Well, this badge demonstrates to employers that you have a deep understanding of the Power Platform and also specifically the functionality associated with all things customer service related.

Developers, business analysts, testers and more may find holding this badge beneficial. In fact pretty much anyone involved in the deployment of Dynamics 365 systems for customer service.

Renewals?

If you already have the MB 230 exam but your certificate is due to expire you may be eligible for a renewal! I recently had an email explaining that I needed to renew my “Dynamics 365 Customer Service Functional Consultant Associate” certificate. I’ve shown a copy of the email below, so you know what to look out for!

You will find that the renewal process includes a set of multiple choice questions that can be completed as a “simple” online survey. One major bonus being that I managed to complete this process for no cost.

If you are confident with the Dynamics 365 customer service you may feel able to dive straight in and take this online assessment. I would however suggest you pause and think before jumping in. (I passed my renewal but I honestly wish I hadn’t rushed!!)

You will almost certainly find that the questions will focus on the latest features or areas of the skills measuerd more recently added to the exam. With MB 230 in mind this might include more recently added topics like Omnichannel and more. So if you aren’t familiar with the latest features maybe some revision prior to taking the renewal test will help you??? (And anyway a bit of revision on your favourite subject won’t hurt you!)

What the exam covers

I will give you a break down of the specific skills measured later in this post but initially let’s consider at a high level what knowledge this exam will require you to possess.

Firstly you will need to understand quite a bit around cases. This isn’t a surprise as the case is the primary entity in customer service. You will need to understand everything connected with the management of cases including things like record creation rules, service level agreements, entitlements and much more.

Next you will need to be aware of how creating a knowledge base might help in customer service scenarios.

Queuing work is an important concept in many customer service processes. So you will need to understand how to define queues and how users might interact with queues.

Scheduling work is also a common challenge, so you will obviously need to understand how to define resources and schedule work for them.

Talking with the customer is important! This is where Omnichannel comes into play. Meaning you will need to understand how to define various digital communication channels and how you route the right conversations to the correct agents.

And finally you will need to understand what reporting / analytic capabilities are available to allow organisations to analyse their performance and identify areas which can be improved.

Exam preparation tips

Get a trial… you can sign up for a free 30 day trial at “trials.dynamics.com”. In my opinion having a trial instance to ensure you get plenty of hands on practice is essential. You can learn a lot by reading blogs and documentation about Dynamics 365 and the Power Platform. But when it comes down to it there is no substitute for getting your hands dirty. Use the product as much as possible as part of your revision.

Plan … you may have taken multiple Microsoft certifications before. Maybe you have even taken one of the previous Customer Service certifications. (For example, MB2-718.) This means you may feel you already know many of the skills measured in great detail. But you should still try to plan your revision carefully. Dynamics 365 is a massive product and you may find yourself being tempted into reviewing many topics outside the scope of the MB-230 exam. This is why I always start my revision process by printing off the skills measured statement. I then highlight all of the topics I know I need to review. This process allows me to be clear on what I need to learn. I can create a list of revision topics and tick them off as completed. Meaning I ensure I cover everything required and also I avoid “wasting time” reading irrelevant material.

Don’t rely on one source of information! … Hopefully this series of blog posts will prove useful. But I strongly encourage you to not rely on it! There are many blogs out there which are written by Dynamics 365 fans, Microsoft Certified Trainers and MVPs. Seek out these blogs and read as many as possible. Also, read and re-read as much information as you can from docs.microsoft.com … reading some of the content can occasionally be hard work! But there is no better source for information about Dynamics 365!

https://docs.microsoft.com/en-us/dynamics365/customer-service/

Skills Measured

So, as promised earlier, I have given a breakdown of the skills measured below.

Again I encourage you to look at the Microsoft content! As they do update the skills measured from time to time. And depending on when you are reading this blog post additional items may have been included! Or some old subjects removed.

https://docs.microsoft.com/en-us/learn/certifications/exams/mb-230

Manage cases and Knowledge Management
Create and manage cases· configure cases

· manage case lists

· create and search for case records

· convert activities to cases

· perform case resolution

· implement parent/child cases

· merge cases

· set autonumbering for customer service entities

Configure and automate cases· implement Advanced Similarity rules

· implement record creation and update rules

· implement case routing rules

· customize the Case Resolution form

· configure Status Reason transitions

· configure business process flows

· capture customer feedback by using Customer Voice

Implement Knowledge Management · configure the Knowledge Search control

· link an article with a case

· use Knowledge Management to resolve cases

· manage the Knowledge Management article lifecycle

· manage Knowledge management articles

· configure entities for Knowledge Management

· manage Knowledge article templates

· implement Knowledge Search

· enable Relevance Search

· configure categories and subjects

· convert cases to knowledge articles

Manage queues, entitlements, and service-level agreements
Create and manage queues · describe use cases for each queue type

· configure queues

· add cases and activities to queues

· configure entities for queues

· perform queue operations

Create and manage entitlements · configure entitlements

· define and create entitlements

· manage entitlement templates

· activate and deactivate entitlements

· renew or cancel an entitlement

Create and manage SLAs · define and create service-level agreements (SLAs)

· configure SLA settings

· configure a holiday schedule

· configure a customer service schedule

· implement actions by using Power Automate

· manage cases that are associated with SLAs

· manually apply an SLA

· create and manage SLA items

Implement scheduling
Manage resources · configure business closures

· configure organizational units

· configure resources

· configure work hours

· configure facilities and equipment

Manage Services· define services

· schedule a service activity

· configure fulfilment preferences

· create a schedule board

· schedule a service activity by using the schedule board

Implement Omnichannel for Customer Service
Deploy Omnichannel for Customer Service
· provision Omnichannel for Customer Service

· define user settings

· configure application setting

· manage queues

· configure skills-based routing

Implement Power Virtual Agents
· describe Power Virtual Agents components and concepts

· integrate Power Virtual Agents with Dynamics 365 Customer Service

· escalate conversations to a live agent

Manage channels · describe use cases for the Channel Integration Framework

· configure channels

· enable the chat widget on websites

· configure pre-chat surveys

· configure proactive chat

· configure Secure Message Service (SMS)

Distribute work
· describe difference between entity routing and channel routing

· configure work streams

· configure entity routing

· configure routing values

· implement context variables

Configure the agent experience
· create macros

· define agent scripts

· configure Quick Responses

· configure sessions and applications

· configure notifications

Configure the supervisor experience
· configure Omnichannel Insights dashboard

· configure intraday insights

· customize KPIs for intraday insights

· enable sentiment analysis

Manage analytics
Configure Customer Service Insights· describe capabilities and use cases for Customer Service Insights dashboards

· connect to Customer Service Insights

· manage workspaces

Create and configure visualizations
· configure interactive dashboards

· design and create charts

· design reports by using the Design wizard

Hopefully this post has given you a good over of the MB 230 exam. In future posts I will complete a deep dive into each of the skills measured mentioned above with an aim of creating a pretty comprehensive revision guide.

MB-230: Microsoft Dynamics 365 Customer Service – Customer Service Overview

$
0
0

I am currently revising for the MB-230 exam. This exam is for Microsoft Dynamics 365 and covers all aspects of customer service. As I revise I plan to publish blog posts that collectively will become a complete revision guide for anyone embarking on the same journey as me. In this post I will give an overview of some of the basic concepts we can expect to find in customer service scenarios.

In my opinion, customer service is a critical element of Dynamics 365. I hold this opinion as all good customer relationship management (CRM) systems should include a heavy focus on customer service as they should always put the needs of the customer first. But why is this true?? The answer is simple … giving excellent customer service leads to a happy customer. It should be obvious why we want happy customers! Unhappy customers are not good candidates for repeat business and more importantly they are also likely to become social media detractors. Customers will often publicly comment on the support they receive! I would suggest that it is essential for every business to ensure their customers become fans who are “promoters” rather than “detractors”.

Giving good customer service involves having well defined business processes, excellent information and a consistent repeatable approach. Agents need to gain access to key information in a timely manner and have solutions available to them to quickly respond to customer requests. Dynamics 365 helps companies achieve this critical aim. As you review these revision notes I hope you can clearly see how cases, knowledge base, SLAs, scheduling, omnichannel and much more all come together to provide a set of tools to manage the critical business processes involved in customer service.

You may have seen diagrams similar to the one shown below many times before! It splits the Dynamics 365 into the applications that make up the entire solution. I would suggest that customer service influences most of these modules. However commonly customer service will be directly connected with two applications, those being the “Customer Service” and “Field Service”. The Customer Service application provides facilities such as case management and an integrated knowledge base to handle customer requests. The Field Service application is closely related but has a focus on providing service in the field. Imagine your company supplies air conditioning units. It would be likely that you’d have a number of engineers who would visit customer sites to install, service and repair your air conditioning systems. It is in scenarios like this that the Field Service application comes into play.

The MB 230 exam will have a focus on the core customer service application. We have another exam which specifically covers Field Service scenarios. (MB 240.) Meaning you might need to be aware that the Field Service application exists but I’m not expecting to need to revise any Field Service topics as part of my MB 230 preparation.

It may also be important to remind ourselves that Dynamics 365 is “simply” a set of applications that are built on the Power Platform and make use of the Dataverse. (aka the database behind the Power Platform.)

Power Platform applications are made up of Power BI (Business analytics), Power Apps (application development), Power Automate (process automation) and Power Virtual Agents (intelligent virtual agents). Dynamics 365 Customer service is therefore a model driven Power App that may make use of all of the elements of the Power Platform and you can extend as required using the tools provided within the Power Platform.

This approach creates a powerful and extensible customer service application!

Before “diving into” the specifics of various aspects of the Dynamics 365 Customer Service it’s important to gain an understanding of key service principles, entities and any associated terminology. If you have been working with Dynamics 365 for any length of time these concepts should be pretty familiar but a bit of revision never hurt anyone!

The service module within Dynamics 365 can be used to address multiple customer scenarios. Including customers reporting faults, scheduling service visits or resolving issues. Or alternatively a customer may simply phone for some advice or guidance, in this scenario the use of the knowledge base may be essential. These types of scenario can be supported by business process flows which help guide the operators, ensuring a consistent approach.

It is important to understand the key record types and concepts applicable to servicing with Microsoft Dynamics 365. Some of these are covered at a high level in the table below. The concepts mentioned here will be expanded upon in my future posts.

Term / Record typeDescription
Customer RecordsWhen the term customer is used this can refer to the “contact” or “account” that require service. In several situations you will find one field called “customer” that can link to either a contact or an account.

Note: In the context of service the customer field never links to a Lead.

CasesThe case is the key record type in service management, each case represents a single incident of a service request. (In fact the term incident is often used to refer to a case, you should therefore consider these as interchangeable terms.)

Companies may create cases for a multitude of reason, including handling a complaint, logging a service request or even simply recording the fact that a customer has a question. As we will see in later posts, each case has a status. As cases are progressed they change from an open status to resolved.

Work OrdersLike cases work orders are requests for service. However in Dynamics 365 when we use the term work order we’ll be referring to a service that needs to be completed in the field. (Therefore within the Field Service application.)
ActivitiesInteractions between a business and their customers, typically including phone calls, emails, tasks, letters and appointments.

Although beyond these out of the box activities other bespoke activity types can be created to reflect additional scenarios unique to a particular organization. It will be common for companies to use activities to log all activities with a customer regarding a case.

Resolution ActivitiesResolution activities are a “special” activity type regarding the resolution of cases, these are created when cases are resolved. And can later be used for reporting on service effectiveness.

Note: One case could, in theory, have multiple resolution activities. As it may be resolved, re-opened and resolved again.

PostsCase resolution activities should not be confused with posts!

Posts are another concept which can be used to record key events on a table. In the example of cases this might involve the case being created, resolved and more.

Knowledge Base ArticlesA knowledge base is a repository of informational articles used to help resolve cases. These may be purely used internally by the customer service representatives or also shared externally. By emailing articles to customers or possibly by the article being made public via a customer service portal.
EntitlementsUsed to specify the amount of support services a customer is entitled to, for example a new customer maybe entitled to 8 hours of phone support within the first three months of a contract. Entitlements include “entitlement channels” that further define how much support can be given by specific channels.

Entitlements may also define which service level agreement (SLA) to apply to which customer.

Service Level Agreements (SLA)A service level agreement defines level of service that your organization agrees to offer a customer. This maybe for the time to respond to a service request and / or the time to resolve a request.
QueuesQueues are essentially lists, they offer a place to organize and store activities and cases waiting to be processed.
Subject TreeHierarchical list of subjects an organization can use to classify service cases and other records
Products Products are defined in the product catalogue and can be used to provides a detailed view of service events at a product level

Before we dive deeper, lets quickly look at some key areas that make up the service offerings within Microsoft Dynamics 365;

ItemDescription
Case ManagementAs already mentioned cases are the key entity used for servicing a customer, their basic usage is pretty straight forward but you will need to have an appreciation of several related topics. Including entitlements, service level and agreements.
Knowledge BaseThe knowledge base supports the creation of articles that maybe used to help resolve cases.
Customer Service Hub (CSH)The term customer service hub refers to the Dynamics 365 app used to access all of the key features found in customer service module.

Commonly this will be the app that customer service agents use the most.

Note: If you happen to see the phrase “Interactive Service Hub” (ISH) then this will be referring to a comparable app we found in earlier versions of Dynamics 365.

Customer Service WorkspaceCustomer service workspace is a relatively new customer service app. Like the customer service hub this provides all of the key features needed by customer service agents. But in addition it provides an interface similar to that found in “Omnichannel for Customer Service”. (More on that later!)
Unified Service DeskUnified Service Desk (USD) is a tool which brings together multiple technologies into a single interface. You can use USD to create a “solution” which can help simplify the processes followed within high volume contact centres. (Regular readers of my blog might know I often write about this!)

Note: USD is aimed at scenarios often found in contact centres. Contact centre agents also now have the Omnichannel for customer service app.

Tip: From an MB 230 point of view, you may need to be aware of USD but I have not seen any specific references to USD in the skills measured statement. Therefore I am not expecting any detailed questions around USD.

Omnichannel for Customer ServiceOmnichannel for customer service is an app designed for agents working in a service contact centre. It provides a multi-session / multi-tab interface which with additional productivity enhancements allows agents to quickly handle customer queries.

In addition conversations from digital channels are routed to agents using Omnichannel for Customer Service. These channels can be very varies including web chat, Facebook messenger, Twitter and many more.

As mentioned above “Customer Service Workspace” and “Omnichannel for Customer Service” share the same interface approach.

Field ServiceField Service is an application that helps organizations manage their field engineers. It adds many capabilities including work order creation and management, work order scheduling, mobile access for field agents, inventory management etc.
Reporting / InsightsMicrosoft Dynamics 365 supports an organisations reporting requirements by making use of dashboards, goals and Power BI.
Customer VoiceCustomer surveys are possible using the Customer Voice feature. This can be used to help obtain metrics on customer satisfaction levels following incidents of service.
SchedulingThe customer service app includes the ability to route work to appropriate resources. This concept supports definition of working hours, resource skills and many more concepts all of which work together to create a sophisticated scheduling tool.

The scheduling is completed on a schedule board which gives a rich graphical representation of available agents and assigned “jobs”.

Power Virtual AgentsPower virtual agents can be used in conjunction with Omnichannel for Customer Service. You might use a virtual agent to answer questions from a customer and if / when the virtual agent is unable to assist the customer it can perform a hand off from the virtual agent to a human.

Hopefully this post has given you a very quick introduction into the concepts needed for the customer service certification (MB 230) In later posts we will dive deeper into many of these concepts.


MB-230: Microsoft Dynamics 365 Customer Service – Case Management (Part Two)

$
0
0

I am currently revising for the MB-230 exam. This exam is for Microsoft Dynamics 365 and covers all aspects of customer service. As I revise I plan to publish blog posts that collectively will become a complete revision guide for anyone embarking on the same journey as me. In this post I will continue to describe the important topic of case management.

Part of the skills measured statement relating to case management is shown below. From this we can see that case management covers a wide variety of capabilities;


In total I will cover quite a bit of ground! In a previous post I have already included;

  • An over of Cases
  • Case Views
  • Searching Cases
  • Creating Cases from Activities

This post will cover multiple topics, including;

  • Resolving Cases
  • Parent / Child Cases
  • Merge Cases
  • And maybe more!

Resolving Cases

The purpose of a case is to track customer issues, questions, and requests. And then to manage them through to resolution. It is therefore a given that cases will eventually be resolved and makes it important to understand the resolution process. When cases are resolved we must enter the resolution type, resolution and billable time. Out of the box the two resolution types are “Problem Solved” and “Information Provided.”. The resolution field is simply a text field describing how the case was resolved.

After resolving a case its status changes to resolved. Additionally a resolution activity is created that we can see in the timeline.

Cases are never resolved with open activities. I guess technically this means they can’t be resolved until all activities are completed. However if you try to resolve a case with open activities, you will see a prompt similar to the one below. If you click confirm all open activities will be marked as cancelled. This is because it is not possible to resolve a case with open activities.

It is however possible to create an activity on a resolved case, that way we can have open activities on a resolved case! Why? The resolution logic forces us to complete everything before resolving, that makes sense! But imagine you want to call the customer back to check they were happy with the service provided. Then you would need to create an activity on the resolved case.

Cases can be cancelled or deleted. Deleting a case will also remove all of the associated activities, notes and attachments. Cases cannot be cancelled whilst open activities exist. (So any open activities will be marked as cancelled when you opt to cancel the case.)

Cancelled or resolved cases can be reactivated. (Obviously deleted ones can’t!) You should probably be aware that a resolution activity is created each time a case is resolved. Meaning we can see multiple activities for case resolution. (An example is shown below.) . If the case be reopened the status on the existing resolution activity will change to cancelled. Another resolution activity will be created when the case is finally resolved. Meaning you can have multiple resolution activities per case but only one will have a status of complete.

Below you can see that I have two case resolution activities in my timeline as the case has been resolved, reopened and then resolved again. You might want to try this process as part of your revision. Once you have multiple resolution activities try opening those to see the detail of each. (You should notice that the status on the original resolution activity becomes “cancelled”.)

As we resolve cases the billable time and total time on the case is defaulted to a sum of the duration of the completed activities associated with the case. The billable time can be changed as you may need to bill more or less time than the amount calculated from the activities. This sum of billable time is always all completed activities. (Meaning if you spent 5 hours working on a case, resolved it, reactivated it, spent 5 more hours and then resolved again. You would have two resolution activities, the first for 5 hours. And the second for 10 hours.)

As cases are resolved they will disappear from the active case views, as they are no longer active. They can however still be viewed in the resolved case views.

With earlier versions of Dynamics 365 I would have told you that the case resolution dialog cannot be customized. (At least not in a supportable way!) But more recently Microsoft has given developers the ability to customize the resolution dialog. We can now add or remove fields on the dialog or even use a Quick Create form as a replacement for this dialog.

Below you can see that with the Service Management area of the customer service hub I can control various settings about the behavior of the customer service app. (No doubt we will return to this screen in future posts!) In this instance you can see that under the service configuration option we have a field which allows us to define what type of case resolution dialog to use. Be that the out of the box (standard dialog), a customized dialog or quick create dialog. Obviously if you select customized dialog or quick create a developer may need to have created you a customized experience.

Why is this important?? Well… one common example is the billable time field. I have explained how the billable time is calculated and also you may notice it is a billable field. But many organizations might not bill for each case. It may therefore be a common customization to hide this billable time field. (Please understand that this is just one example of why we might customize the resolution dialog, obviously many other reasons will exist.)

If you’d like to find out more about customizing the case resolution dialog … check out the link below to Microsoft’s documentation on the subject.

Modify case resolution dialog in Customer Service Hub | Microsoft Docs

Parent / Child Cases

Parent and child cases are designed to help cases be used efficiently. You can create a primary case (parent) and then create a secondary case(s) (children).  Child cases can inherit information from a parent case. This can be very useful to group related problems. You might do this is a single customer has multiple issues that will be worked on together. Or you may have a common problem with multiple customers.

You can see child cases in the case relationships section of the case relationships tab. To create a child case you use the “Create Child case” button which can be found in the command bar.

Note:
You might need to be aware that a child case cannot be a parent. Meaning a complex hierarchy of cases is not possible.


You can see below that I have clicked “Create Child Case”. A quick create form has opened an I can fill in any additional information as required. You may notice that many fields will default from the parent into the child. We will look at how to control that behavior later!


Below you can see that on my parent case, in the “case relationships” tab I can view the child cases. I could also create a new child case from here or even use the “…” option to associate an existing case to this parent.


It is also possible to build a parent / child relationship between existing cases. Below you can see that I have selected two existing cases in a view. (I could select many more cases!) I can then use the “Associated Child Cases” option to link these.


Having clicked the “Associate Child Cases” button I am presented a list of the selected cases. I can then pick which of the cases will become the parent.


Several settings control how parent / child cases behave. I have already mentioned that we can control which fields are defaulted on the child from the parent. We may also want to define what happens to the child cases when the parent is resolved.

Below you can see that from within my Customer Service Hub I have opened the “Service Management” area. In here you will find an option called “Parent and Child Case Settings”.


Below you can see that within the settings I can control which fields are inherited on the child from the parent. Out of the box the case title and customer are copied from the parent case. But I might want to add additional fields. Maybe, for example, the same user should own the child case as the parent.


Next you can define what happens when you try to resolve the parent case.

One option is to stop the parent case being resolved until all the children are resolved. To give an example … imagine you are installing a new central heating system. You might have multiple separate cases to install the boiler, radiators, thermostat and more. You won’t resolve the parent for these until all the separate jobs (cases) have been completed.

Another option is to resolve all the children when the parent is resolved. For this think about other scenarios. Say you provide internet connections to customers. You might have multiple customers effected with the same outage. In this example resolving the primary parent issue would in turn resolve the issue for all the effected customers.


Merge Cases

Sometimes you might find that duplicate cases have been created, maybe a customer reports the same problem on different communication channels or multiple contacts at an organization report the same issue. When this happens cases can be merged, avoiding the need to resolve each incident separately.

Merging cases combines related open activities and attachments under one case and cancels the other case(s).  When a case is merged, the state of the case is changed to cancelled and the status reason is changed to merged.  You can merge up to 10 cases at a time.

To merge case select up to 10 cases and then select the merge case option. Typically I find it will be active cases we’ll want to merge but it is possible to merge resolved cases.

Below you can see that I have selected three cases and now I can use the “Merge Cases” option to merge them.

Having clicked merge cases I am presented with a list of cases to merge. I select the case I want to retain and click merge.

If your merge is successful you will see a confirmation message. Alternatively you might see an error. (For example, an error could happen, for example if you try to merge multiple child cases with different parents.)


You can see any cases that have been merged into a case in the case relationships tab. Notice that my merged cases now have a cancelled status.


As part of your revision I suggest you try merging multiple different cases. One thing to test is what happens with any activities (and notes) that already exist on the case. As below you can see that the timeline on my merged case has multiple activities. These came from the now cancelled cases. (Meaning the activities will no longer show against the cancelled case!)

If you merge a case that has child cases (i.e. A Parent), then the child cases become child cases of the new parent case.

But you can only merge a child case into another child case if both of the child cases have the same parent case.

Theoretically, you could merge cases from multiple customers. (Although “maybe” this isn’t common.)

Autonumbering

Whenever a case is created it is given a unique reference number. This can be really useful to help you search for cases, often this number will be given to a customer. So they can quote it in any follow-up communications. Below you can see that the case number is often shown in views. (You will also find it prominently displayed on the main case form!)

Often times the logic applied to generating this number will remain unchanged. But you do have some control how this number is generated.

Tip:
Auto numbering actually applies on other entities including contracts, cases, quotes, orders, invoices, campaigns, articles, categories and knowledge articles.

Knowledge articles are an another example of a customer service table which can have an auto number applied.

You will find the “Auto numbering” option in the “Data Management” area of the settings for your environment. You can find this option within the “Power Platform admin center”. Which is accessed from “admin.powerplatform.microsoft.com”.

Opening the auto numbering option will give us access to amend the format of the number used. For each table that has an auto number we can set the prefix and control the length of the suffix. (The suffix can be 4,5 or 6 characters long.)

Hopefully this post has helped you prepare for your MB 230 exam. I have covered quite a lot of concepts in one post. As always I do stress that you should test out these options for yourself, do not rely on just theory!

Customer Service Workspace – App profile manager, session templates and more!

$
0
0

Customer Service Workspace for Microsoft’s Dynamics 365 gives us the ability to open sessions and tabs in customer service scenarios. This can be very useful when an agent is juggling resolving multiple cases simultaneously. When they open a case it will be common to open the customer record, in this post I will show how we can always open the customer record and therefore save a few clicks. And in doing so, I will introduce several concepts including the app profile manager, session templates and application tabs.

App Profile Manager

Firstly I would like to mention the App profile manager. As I am going to use this for my example ….

The App profile manager allows me to create profiles which in turn I can assign to users. This gives us an approach to customize the interface for specific users. Some of my users may require particular behaviour when a session starts, maybe some want the productivity pane to be open by default, maybe some need access to specific communication channels etc etc.

You may already be using Customer Service Workspace or the Omnichannel for Customer Service apps without using the app profile manager! This is probably working fine as any user not assigned to a specific app profile will be using the default app profile. If you apply any customizations to the behaviour of the Customer Service Workspace app I advise you to consider using the App profile concept. You can of course start off with just one profile but by using the App profile manager adding suer specific customizations later will become an easy process.

Something else that is really cool about app profiles is that they are solution aware. Meaning you can migrate them from environment to environment.

Below you can see I’ve opened make.powerapps.com. I have used the app option to find my “Customer Service Workspace” app. It is from here that I can open the “App profile manager”.

Initially when you load the App profile manager you will be presented with a screen something like the one below. If this is your first time loading the App profile manager you will probably want to use the “create an app profile” option to start creating your first profile. Or you can use the “See you app profiles” option to open a list of your existing app profiles.

If you are creating a new app profile, you will need to give your app a name. Then specify a unique name.

Tip: The app unique name needs a “publisher” style prefix, say “neil_”!

Now your app is available and you can start to customize it.

Example Session Template

Whenever I consider a new feature like this I like to work with an example. Hopefully showing how an example session template will work I can help give you ideas for your own sessions.

Note: In my example I am going to focus on session templates but you should be aware that within my app profile I can control the behaviour of the productively pane. I can also define which omnichannel or third party channels I might want to include in this profile. Say some of your users need access to web chat and others don’t then you can use this feature to support that requirement.

In my example, whenever a user opens a case I want that case to open in a new session. I also want to make the title of the session the case number.

But I would also like to go further, as whenever the case opens in a session I would like a second tab which will include the customer associated with the case. Not forgetting that sometimes that will mean opening a contact and sometimes an account.

If I have an existing session template I can search for that and include it in this profile. Or I can use the “+Add entity session templates” option to create a new one. (As shown below.)

Below you can see that when I click the “…” option on an existing session template I can open it in the Unified Interface or remove it from this profile. Opening in the Unified Interface will open a fresh browser tab containing the session template and access to all of the other Customer Service Workspace options.

Below you can see that I have created a customer session template. I will give more detail of each field below!

FieldDetails
Name“Custom Case Session”

This can be anything you like, it describes the session template.

Unique Name“neil_CustomCaseSession”

The format is important here! You need to add a prefix which will normally be your publisher. So in my example “neil_”.

Type“Entity”

Two types of session exist.

In my example I have used “entity” as when a user opens a case entity (or phrased another way a case table row!) then we want a session to start.

The other type of session is a “Generic” session. We use that with Omnichannel for Customer Service when the session start will happen as conversations begin.

Entity“Case”

Assuming your session type is “Entity” then you will need to specify which table triggers the start of these sessions.

Title“{anchor.ticketnumber}”

We can optionally add details of how to name the sessions as they open. If you leave this field blank then the primary field from the entity selected would be used. Typically this would be a name field or in my case example the title of the case. But in my example I didn’t want to use the title as the shorted ticket number seemed like a better field.

I have surrounded the “slug” in brackets. And also added the keyword “anchor.” before the name of the field. This is because we can reference fields from the tab used to open the session by adding this “anchor.” prefix.

Communication panel mode“Hidden”

In my example the communication panel is hidden. Other options include “Docked”.

We’d probably want to see a communication panel on a generic session that has been started as a result of an incoming omnichannel conversation. But in my example I don’t need the communication panel, hence the setting of hidden.

Having saved my session template I can add additional details. These may included which agent scripts to load at the start of the session. Or like in my example, any additional tabs you’d like to open. As each time my session opens I wanted to also open a tab contain the customer from the case.

Therefore I created an Application tab and added this as an additional tab on my session. I have shown my Application tab below. And again I will give you some additional detail below!

FieldDetails
Name“Customer – Customer Application Tab”

This is simply a descriptive name for my tab.

Unique Name“neil_customcustomer_applicationtab”

Like the session template the format is significant here! You need to create a unique name that is prefixed with your publisher. So in my example “neil_”.

Note: This idea of creating a unique name that includes the publisher prefix should start to make more sense when we add our app profile into a solution. As then the names for our templates will be following the same naming convention as other assets in our solutions.

Title“Blank!”

In my session template I completed the title field. As an example in my application tab I left the title blank. This is because I was happy to name the tab as the customer being opened.

Page Type“Entity Record”

In my example I want to open an application tab containing a Dataverse table. (aka entity).

But I could have selected one of several different page types. Including an entity view, web resource, dashboard and more.

Description“Blank!”

I didn’t enter a description. I was being lazy!

In a production instance it might be useful to enter details of how and when this tab will be used. As that might aid future maintenance.

Can close“No”

When my customer tab opens I want it to remain open until the session is close. By entering “Can Close” as “No” I prevent the users from closing this tab.

ParametersDepending on the page type different parameters may exist. Having saved my application tab as I had select “Entity Record” I have a set of standard parameters. These included “createFromEntity”, “data”, “entityID” and “entityName”.

In my example I want to open an existing customer record into the tab. The customer many by a contact or account. So I need to supply two fields, one being the GUID of the record to open and the other being the type of table (entity) I want to load.

Both of these fields can be “grabbed” from my anchor tab. Which will be the case I am opening.

Set the “entityID” to “{anchor._customerid_value}”. This will be the GUID of the customer I want to open.

Set the “entityName” to “{anchor._customerid_value@Microsoft.Dynamics.CRM.lookuplogicalname}”. This will be the entity type I am trying to open. So “account” or “contact”.

Assign Users

Having completed the definition of my app profile, I can now add users. These will be the users that will use this profile in preference to the default App profile.

Below you can see that I have opened my App Profile and selected the users option.


A screen similar to the one shown below will open and you can add users into this profile.


Testing

Once I had completed the above changes I opened my “Customer Service Workspace” app. You can see below that by default I have my customer service agent dashboard open.

Opening a case into a new session from this dashboard or any home page will start a session.

Tip:
Out of the box use “shift and click” to open your case into a new session. Or configure the simplified interface option that will open all records opened from a home tab into a session.

As my case opens in the session several things happen!

Firstly notice that the session name is not the title of the case. As above I set the session title to be the case number instead.

Also notice that a second tab opens that contains my customer record.


And when I click on my customer tab notice that I don’t have the ability to close the tab. Meaning the user is forced to keep this tab open until they have finished with the case and close the session.


Solution Aware!

I mentioned earlier that app profiles are solution aware.

As a test I created a solution. You can see that I then used the “Add existing” option. Here you will find an option called “App profile”. So I used that to add my custom app profile into my solution.

Next I used the add required components option on the app profile I just added into my solution.

You can see below how my application tab and session template that had been included into my App Profile are now added into my session for me. I could (of course) have added these components manually but I found using the “+ Add required components” option made my life really easy!

I can now export my solution and import it into other environments as required.

Hopefully by showing this example I have introduced you to the Customer Service Workspace and shown how I can use the App Profile Manager to customize my agent experience. I hope this example has proved useful and that you can adapt this idea for many other purposes. Enjoy.

Dynamics 365 Birmingham – Amazing Free May 2021 Event

$
0
0

We have our next “Birmingham” Dynamics 365 event planned for Wednesday 19th May at 5:30pm. This is a free virtual event so open to everyone.

Everyone can register on meetup here for free.

Our next exciting Dynamics 365 Birmingham User Group meeting will be taking place on Wednesday 19th May 2021 at 5:30pm, and we would love to have you along!


We hope to see our local friends. But being a virtual event EVERYONE will be very welcome.

This time we have two amazing speakers. But I would think that … one of them is me!!!

Session : A new & unique approach to data cleansing in D365
Speaker : Ben Warren, The Software Bureau

Ben Warren, from The Software Bureau & Clean Contacts will join us to describe their data cleansing tool. Every business has to clean their data, but the current methods can be complicated and risky. Clean Contacts enables automated data cleansing of UK consumers – identifying where an individual has moved, where they have moved to or if they have passed away.

Hosted within MS Azure, with no data having to leave the environment to ensure maximum security, and integrated into D365 using the Power Platform.

This session will provide an overview of the solution and demonstrate how a D365 user can gain total peace of mind.

Session : Customer Service Workspace
Speaker : Neil Parkhurst (aka me!!)

Dynamics 365 now includes several user interfaces your customer service agents may want to use. I’m sure you know we already have Customer Service Hub, Unified Service Desk and Omnichannel for Customer Service.

Customer Service Workspace is the newest kid on the block! So what does it offer and when might you use it in preference to these existing established options.

In this presentation you will see a demo of the Customer Service Workspace. And additionally the App Profile Manager and more!!!

Everyone can register on meetup here for free.

MB-230: Microsoft Dynamics 365 Customer Service – Automate Cases (Part One)

$
0
0

I am currently revising for the MB-230 exam. This exam is for Microsoft Dynamics 365 and covers all aspects of customer service. As I revise I plan to publish blog posts that collectively will become a complete revision guide for anyone embarking on the same journey as me. In this post I will begin to discuss the options available to use for case automation.

Part of the skills measured statement relating to case management and case automation is shown below. From this we can see that case automation includes many topics. Including record creation rules, case routing, status reason transitions and more.

In this post I will cover;

  • Advanced similarity Rules
  • Record Creation and Update Rules
  • Case Routing Rules

In a future post I will cover;

  • Case resolution form
  • Status reason transitions
  • Busines Process flows

Note:
I will leave “Customer Voice” for a further post as that “feels” like a bigger subject that deserves its own post.

Similarity Rules

As agents work on cases it can be useful to view similar cases, as these might give clues to resolution approaches. Or maybe it might highlight a fact that other people are having a similar issue. Advanced similarity rules give us a way to configure how this feature will look for possible similar cases.

Below you can see that I have opened a case and that I have navigated to the similar cases area. Having done this I can see other similar cases.

If the agent thinks the information on any of these case may be useful …. Click the case will open additional details without them needing to navigate away from the current case. As shown below!

As mentioned in my introduction to this section we can tailor the similarity rules. Maybe in your organization we only want to look at resolved cases or maybe you’d like to add the ability to search additional custom description fields. Below you can see that I have opened the “Service Management” area of my customer service hub. Here we will find an option called “Advanced Similarity Rules”.

You will see the rules in this option. Notice that my rule is active. If you wish to amend the rule you will need to deactivate it. And don’t forget to re-activate … as until you do the search will not operate!

Opening my rule will initially who various options. I can for example add “noise key phrases”, these are terms I wish to exclude from my search. Maybe you have commonly used business phrases that would add no value in being searched and could also result in false matches. Additionally I can filter by the case status. Meaning I could focus on just resolved or open cases if required. (Or maybe I want to exclude all cancelled cases from my search!)

The match fields tab lists the fields which are being used in my similarity search. In my example we are just looking in the case title and description.

We can option to complete a text match on the fields, meaning we’d look for matching “phrases” within this fields. Alternatively you could also set the criteria to look for an exact match.

Note: You may need to be aware that the case similarity logic uses the relevance search. Which should ideally be enabled to allow accurate matches to be returned. Additionally any fields enabled for exact matching logic will need to be defined as “find columns” in your quick find view on the case entity.

You will find a detailed explanation of the implications of the relevance search and how to add columns into your quick find view in the article below from docs.microsoft.com

Suggest similar cases for a case with Dynamics 365 Customer Service | Microsoft Docs

Case Routing Rules

An important aspect of working with cases is ensuring the right people are working on the right cases. For this we use case routing rules. Cases can be routed to a team, user or queue.

This will happen when a case is created or the “Save and Route” command button is selected. I think the idea being that you’d initially route a case to a queue when it is created. But during the life of the case we can use the “Save & Route” option to trigger the case to be re-routed to an alternative queue. (You might do this, for example, when the priority changes.)

You might want to send all high priority cases to a particular queue or assign all major complaints to your complaints manager.

Whenever the “Save & Route” option is selected you will be prompted that the case is going to be automatically routed. The routing rules are then reviewed and the case assigned to a team, user or queue as required. If not matching rule is found the cased would be saved and the ownership would remain unchanged.

Case routing rule sets are created in the settings / service management of Dynamics 365. To find this open the customer service hub and change to the “Service Management” area.

The concept is that we create a set of rules for a table (entity). You might find it useful to understand that we can create routing rule sets for any entity that can be queued. For example, above I have created a routing rule set that might apply to leads collected from our web site.

Note:
Organizations can only have one active routing rule set [er entity at any given point in time.  If you create a second one and activate that, the first rule set will return to a draft status

Below you can see an example rule set. Notice that I have two rule items (you could have more) … in my example I have deiced to route high priority cases to a particular queue. I also route any cases that have been generated from Internet of Things (Iot) alerts to a particular user.

Note:
After you create a rule set it will be in draft mode. You need to select activate to make it live. Only one rule set can be active at any point in time. So activating one rule set will set all others back to a draft status.

Notice that my rule set below is “Read-only” meaning it is activated. If I need to make any changes I will need to deactivate it, make the changes and then re-activate.

Opening the detail of my rule item shows that I can filter cases using rule criteria. This is used to decide when a particular routing rule should apply. In my simple example I am used checking the priority of the case but you may need to create more complex rule criteria.

Below the rule criteria I define what action I want to take. In my example I have decided to route to a queue called “Urgent Cases”. But I could have easily routed to a team or user.

We have seen that I can route cases when they are created or when I select the “save & route” option. It is also possible to select one or more cases from a view and use the “Apply routing rule”. This might be really useful if you need to re-evaluate the queue for many cases at once.

Record Creation Rules

Record creation rules are something I often think about in context of customer service scenarios but you could also use them in many other scenarios. For example in service I might want to create a case when someone sends an emails to my “support@blablabla.com” email address. But equally I might want to create a lead if someone sends an email to “sales@blablabla.com”.

Tip: If you haven’t used record creation rules for a while ensure your revision includes creating some rules! As they have evolved in recent times. In that they are now based on Power Automate Flow rather than classic workflows.

You can find the option to setup automatic record creation rules in the service management area of the customer service hub. I have shown mine below.

Tip:
You might find this article from Microsoft useful!

Automatically create or update records in Customer Service Hub (Dynamics 365 Customer Service) | Microsoft Docs

Rule Creation

Initially we create the record creation rule “header”, this includes setting the source type, queue and such like. Below you can see I have linked my record creation rule to a queue I’ve called info@npdynamics.com.

The queue field allows me to define the source queue. Often this could be a queue associated with a “generic” email account. For example, info@npdynamics.com. Meaning any customer who sends a message to this type of address may be registering a service request or sales enquiry. Prior to creating the record creation rule you may need to create and test a suitable mailbox.


Activity type to monitor, a common use of automatic record creation rules is to create records as emails arrive. But we can configure multiple other source types. Including phone calls, social activities and many more.

Additionally you may need to check (or change) the options on the advanced tab. Here you can control when happens when an email from an unknown send is received. In some scenarios you may want to ignore emails from unknown sends. But in others you may want to automatically create contact record for these people.

Plus we can require a valid case entitlement. In the scenario we would want to identify the sender and also check they are entitled to support on the email channel. (or other channels as required!)

The final option lets us define what will happen is an email is received regarding a resolved case. We might want to track those emails against the resolved case. But it may sometimes be an advantage to create a new case if an email regarding a resolved case is receive ed. (As this might suggest a new problem.) This logic can be tailored, as maybe you don’t want to create a new case if a reply is received quickly. But after a period of time it might suggest the customer still has an issue and a fresh case might be required.


Having specified the “header” details I can then add the record creation and update rule. In my example I will create just one rule but you could have multiple rules with different conditions active on one mailbox.

Below you can see that we give the rule a name and then specify a condition to define when this rule should be triggered. In my example I decided to add some conditions to try to filter out automatic replies (e.g. out of office messages) and email that don’t allow replies.

Having defined my condition I now say which type of entity I need to create.


In background a Power Automate Flow will be generated for me! I can click on the “Save and open Power Automate” option to review this. Mine is shown below. In is important that you notice that some of the actions in this flow tell you not to rename the action. So don’t! The actions will be pre-populated and may be sufficient to create your case. But equally you may need to amend these. (For example, you may have some custom fields on the case you need to default etc.) You may also want to add some additional actions into this Power Automate Flow. Maybe you’d want to send an acknowledgement to the customer or a notification to an agent.

Tip:
As part of your revision I suggest you experiment with make changes to this Flow and maybe add some actions to help you understand how this process works.


I have actually covered quite a lot of theory in this post! Similarity rules, case routing rules and record creation rules are important but potentially complex concepts, therefore I suggest your MB 230 revision includes plenty of hands on time using these features.


MB-230: Microsoft Dynamics 365 Customer Service – Automate Cases (Part Two)

$
0
0

I am currently revising for the MB-230 exam. This exam is for Microsoft Dynamics 365 and covers all aspects of customer service. As I revise I plan to publish blog posts that collectively will become a complete revision guide for anyone embarking on the same journey as me. In this post I will begin to discuss the options available to use for case automation.

Part of the skills measured statement relating to case management and case automation is shown below. From this we can see that case automation includes many topics. Including record creation rules, case routing, status reason transitions and more.

I have already covered the following topics in a previous post;

  • Similarity Rules
  • Record Creation and Update Rules
  • Case Routing Rules

In this post I will focus on;

  • Case resolution form
  • Status reason transitions
  • Busines Process flows

Note:
I will leave “Customer Voice” for a further post as that “feels” like a bigger subject that deserves its own post.

Case Resolution Forms

The point of a case is to log and resolve a customer query. Therefore the resolution approach is essential to this process. With previous versions of Dynamics 365 we had just one possible approach to case resolution but we can now customize the resolution process. It will therefore be essential that during your revision you are aware of the options to customize the resolution dialog.

Within the customer service hub you will find the service management area. It is here that we find many options that control the settings connected with customer service. In the “Service Configuration Settings” option you will find the ability to change the case resolution dialog from the standard dialog into a customizable dialog or a quick create dialog.

Standard Dialog

The standard case resolution dialog is shown below. This is the standard approach to case resolution that has existed in Dynamics 365 for many versions. And in many situations will work perfectly well without change.

Customizable dialog

Next we have the customizable case resolution dialog. At first glance it will look very similar to the standard dialog!

However as a developer I can use “make.powerapps.com” to customize the resolution form. So if we navigate to the “Case Resolution” entity you will find the “Information” form. As an example I have created a solution and added the information form of the case resolution entity.

Once done I can now use the Power Apps form editor to make makes to the form. Maybe, for example, I don’t need to see the total time and billable time fields. So I could simply hide them on this information. Once the change is completed and published my case resolution form will behave differently.

Quick create dialog

The final option available is to use the quick create dialog from the case resolution entity. And like the customizable dialog mentioned above a developer could tailor the quick create form as required.

Below you can see an example of the quick create dialog. Notice that the user experience is slightly different but until I customize the quick create form the fields is identical.

Tip: This post from Microsoft includes a description of a possible way we might want to customize the resolution process.

Status Reason Transitions

The is idea of customizing status reason transitions is to enforce a logic in what status values can be assigned next. You may, for example, want to ensure a user can change an “on hold” case to be “In progress” but you may want to prevent the user taking an “on hold” case directly to a resolved state.

Before considering status reason transitions you should ensure you understand the concepts of status and status reason.

  • Status… the status is the “ultimate state” of a record. Typically the values cannot be customized and for most entities just two states exist. (Active and inactive.) Although a case can be “Active”, “Resolved” and “Cancelled”.
  • Status Reason … the status reason field shows the reason for a particular state. For example, an active case can be “In Progress”, “No Hold”, “Waiting for Details” and “Researching”. You can customize the options in the status reason! (Meaning you can add additional reasons as required.)

Status reason transitions allow us to decide which values are available for transition at each reason. This concept might be of particular use if you have created custom status reason values and want to control their behavior.

Below you can see that I have opened my status reason field on the case. It is here that I have customize the options available. I can also use the “edit Status Reason Transitions” option. Importantly notice I am using the classic interface, you may need to be aware of this! As at the time I am creating this blog post I don’t believe you can edit the transition reasons in the newer interface found in “make.powerapps.com”. But luckily we do have a “switch to classic” option which helps in rare situations like this!

Below you can see that I have clicked on edit status reason transitions and I have enabled the feature. Now, for each status reason I can define which reasons can be selected.

For example, with the settings below I can change a case in status “Waiting for Details” to be “Information Provided”, “Cancelled” or “Merged”. But no other state. Therefore before the case can be resolved I would force the user to show that the information has been provided.

This article from Microsoft might be useful when reviewing status reason transitions …. Define status reason transitions with Power Apps – Power Apps | Microsoft Docs

Business Process Flows

Business process flows are a key element of working with cases. Typically, organizations have specific stages in their service management processes. Business process flows can help guide users through the steps to complete each stage.  On a Dynamics 365 record, each stage of the process is represented by a circle.  Additionally, within each stage multiple steps can be found that the user needs to take before they move on to the next stage.  Some of these steps  may be mandatory and need to be completed before the user can navigate to the next stage. (For example: in the identify stage you must enter the customer before moving to the research stage.)

You can see which is the current stage as it has the “double circle” icon. Usefully we can see how long this case has been paused at this stage. Completed stages are marked with a tick.

Clicking on a “stage circle” shows the steps (or fields) which need to be completed before progressing to the next stage in the business process.

The out of the box business process flow on cases includes the following stages / steps;

StageSteps
IdentifyFind customer (Mandatory)

Find Contact

ResearchAssign to Others (Mandatory)
ResolveMark as resolved

Business processes help to provide a consistent approach to handling cases. They can also contain conditional branches giving the ability to handle multiple scenarios.

You can move forward and backwards in the business process. The active stage is indicated by the position of the “double circle” icon in the process bar. And how long the entire process has been active. In my example above the research stage has been active for just 1 minute, as I have only just move the process forward to that stage.

An out of the box process for management of cases is provided but it can be customized to meet an individual organization’s needs. In fact I would suggest that this process will almost always need to be customized to meet the specific needs of each organization.

Note:
Cases aren’t the only record type that can leverage business process flows, they can be applied nearly any record type in Dynamics 365. It is quite common, for example, to have a business process flow to manage the lead to opportunity cycle.

In the case resolution stage we can use the finish button on the business process flow to stop the timers in the business process flow. Therefore, after actually resolving the case you may want to also use the finish button to halt the business process flow.

Tip:
If you do finish the business process flow and the case is reactivated, you may need to also reactivate the business process flow. If, for example, you need to move the stage back to “Research” now the case is re-opened. You do this from the Process option on the case. (As shown below.)

I suggest that part of your revision should include “playing” with the put of the box business process flow. Try moving cases from stage to stage to understand how this operates in detail. And experiment with finishing and reactivating processes.

You may also want to attempt to customize the business process flow. Below you can see that we have a design screen available at make.powerapps.com. This gives developers that ability to tailor business process flows..

If you wish to find out more about amending business process flows …. you could refer to this post for more information on business process flows.

In this post I have (again) covered loads of detail! This time around case resolution, status reason transitions and business process flows. Your MB 230 revision should include some significant hands on time experimenting with these features. Enjoy!

Dynamics 365 Customer Service – Three Stage SLA

$
0
0

Out of the box it is pretty easy to create a two stage SLA with Dynamics 365. This is great as often we have a need for a service level agreement that relates to “First Response By” and “Resolve By”. But occasionally a requirement comes up for a third stage to our SLA, typically something like “Resolution Planned By”. I recently needed to configure exactly this for a customer and thought it might be useful to document the process.

In my example I am going to concentrate on the case table, as generally speaking SLAs will be applied to cases. But you should be aware that you can associate service level agreements with other tables. Maybe you have an SLA for work orders, leads or pretty much any Dynamics 365 entity.

The steps involved in creating the third stage are as follows;

  • Step One – Create a two stage SLA!
  • Step Two – Create a lookup to “SLA KPI Instance”
  • Step Three – Create a “Resolution planned” column
  • Step Four – Create a quick view form and add to case form
  • Step Five – Create third stage in SLA KPI
  • Step Six – Create SLA

Step One – Create a two stage SLA!

For the purpose of this post I am going to assume you already have a two stage SLA. This does mean I’m making another assumption that the reader already has at least a basic understanding of how service level agreements in Dynamics 365 operate.

Below you can see that I have created a very simple example SLA. I have just two SLA items, one for first response and one for resolve by. So a simple but typical SLA.

Below you can see that my SLA results in the standard set of two timers on my case record.


Step Two – Create a lookup to “SLA KPI Instance”

My two timers are fine! But in this example I want to add a third SLA, maybe I want to have an SLA to show when a resolution must be planned by.

Below you can see that I have created a solution for my example. Just to keep my changes grouped together! The first thing I need to do a create a new lookup field to the “SLA KPI Instance” entity. Below you can see that out of the box we already have two fields one for first response and one for resolve by.

Below you can see that I have created a new lookup field. I have mirrored the out of the box naming convention by calling my new field “Resolution Planned By”.

Step Three – Create a “Resolution planned” column

Next I want to create a simple yes/no column the purpose for this will become clearer soon!

I’m going to just call my field “Resolution planned”! Notice that I have opted for a “Yes/No” field with a default of “No”.


The purpose of this field is so that I know when a resolution has been planned. With my first response SLA I have an out of the box field called “First Response Sent” which can be used to know when this SLA has succeeded. So I am creating this field to simple mirror that idea.

In a real-world solution you could decide to know your SLA has succeeded using a different method. You will also probably want to add this field into your business process flow on the case table. But I am simply going to add it to my case form for my demonstration. My case form is shown below ….

Step Four – Create a quick view form and add to case form

I next want to create a new quick view form in the “SLA KPI Instance”. The reason being that the timers I see on the case form for first response and resolve by are actually quick view forms we can find on the “SLA KPI Instance” table.

Below you can see that out of the box I have two quick view forms that relate to cases!

I simply open one of these forms. I then change the field name on the form and save it with a new name. Say “Resolution Planned SLA”.

Tip: I think you should be able to complete this step in the newer editing experience we have in make.powerapps.com. But on the day I tried it I seemed to be struggling! So I reverted to the classic interface!

All I did was rename the existing timer control to be called “Resolution Planned In”!

My final step was to add my newly created quick view form into my existing case form. When I added the quick view form I selected the lookup we created earlier and then the quick view form we have just created.

Below you can see that I have positioned my new quick view form between the two existing out of the box forms.

Before you continue to the next step …. Don’t forget to publish all your changes!

Step Five – Create third stage in SLA KPI

Now my customizations have been completed I can create my the SLA.

Firstly I want to define a new SLA KPI. I do this in the service management area of the customer service hub.

Having selected the case “entity” I can now also select the “Resolution Planned By KPI” lookup as my KPI field.

Tip: Don’t forget to activate your new KPI after saving it!

Step Six – Create SLA

I can now create whatever SLAs I need using this new KPI. Below you can see that I have created a new SLA item in my demo SLA.

Notice that the KPI I have selected is my new “Resolution Planned By” KPI. Also that my success criteria is using the field I added onto my case earlier. As I am using this to know a resolution has been planned and therefore the SLA has been achieved.

My final SLA looked like this …. Notice that I have three SLA items. When I started I had two!

Now when I create new cases (as shown below) I have three stages in my SLA. “First response in”, “Resolution Planned in” and “Resolve in”. All three timers are independent.

You can see below by setting my “Resolution planned” field to yes my SLA for resolution planning changes to a “succeeded” status.

Hopefully you will agree the process of adding a third stage to the out of the box SLAs is pretty straight forward. You can of course have even more stages if needed! Enjoy.

MB-230: Microsoft Dynamics 365 Customer Service – Knowledge Management

$
0
0

I am currently revising for the MB-230 exam. This exam is for Microsoft Dynamics 365 and covers all aspects of customer service. As I revise I plan to publish blog posts that collectively will become a complete revision guide for anyone embarking on the same journey as me. In this post I will review knowledge management.

The section of the skills measured statement that mentions knowledge management is shown below. As you can see we have quite a few concepts to cover connected with knowledge management. I will do my best to cover all of these in this post but please don’t forget that you should actually try these things out for yourself. Real hands on experience is very important!

A knowledge base is a collection of articles which is searchable and can be used to answer customer questions. The articles typically refer to products and services. In Microsoft Dynamics 365 you can search knowledge base articles and quickly associated them with cases, helping to resolve cases. Additionally those articles maybe emailed to customers or even accessed publicly from your customer service portal.

Search Knowledge Articles

Searching for knowledge articles may use the relevance search, so you might need to confirm this is enabled!

You can search for knowledge articles directly from the case form in the customer service hub. As shown below.

Tip: I suggest as part of your revision you experiment with the options available whilst searching!

Articles are initially searched based on the case title. But an agent could refine this search is if needed. The results are sorted by their relevance. The agent can change the sort order to be based on number of views or when the article was last modified. They can also filter articles by status, visibility and modified date.

Articles can be linked to cases. This is useful to show which articles have been used when resolving a case. You can see which articles have been used on the case relationships tab of the case form.

We also have a useful option to email a copy of the article to the customer.

And articles can be rated by agents. This might be useful later when we want to consider which articles are useful as they are and which need to be revised.

In addition to searching for articles directly from the case the agent can use the relevance search to find articles. In the screen shot below you can see that my search has returned both articles and cases which match with the keyword I entered into the relevance search.

You may find this article from Microsoft useful, as it describes the knowledge search ….

Search knowledge articles in the Customer Service Hub in Dynamics 365 Customer Service | Microsoft Docs

Maintaining Articles

We maintain knowledge articles in the customer service hub. You can see below that when I access knowledge articles I can add new ones using the “+ New” option or directly from the + icon in the ribbon bar. (aka Quick create)

Below you can see that I have started to create an article. Notice that a business process flow is used to help with the authoring process.

Tip: Using the business process flow will help you understand the flow of status values on knowledge articles. As they start off as proposed, become approved and eventually get published.

You can use the “summary” tab to view other details about the article. Including its version. Each article has a major and minor version. I will explain these in greater detail below.

It will be import to understand the life cycle of an article. Articles start off in a draft mode. When we move them forward in the business process flow they can be approved or rejected. Draft articles can use the status reason field to show if they are “proposed”, “draft”, “needs review” or “in review”.

Rejected articles will revert to the draft status. Additionally you will see an entry is added to the articles time line containing the reason for rejection.

Approved articles can be published. Below you can see that published articles can be given an expiry date. (Expired articles may still show in search results but will clearly show as expired.)

A published article may have a new version created. (A described below.) Or it can be reverted back to draft mode. Also, an option does exist to directly update the published article if required.

Articles can have major and minor versions. A major or minor version can be created for an existing article. At that point the current published version remains and a copy is created with a new version number. After any changes have been completed the original version will be archived and the new version will replace it.

We can see information in the articles timeline which overtime will provide a useful history of changes in the status and versions on an article. As each time an article is revised a post is created that will help us understand when revisions have been applied.

Additionally the article’s “SUMMARY” tab will give us access to some Additional fields and other related information. Including, related versions, related translations, related categories, related articles, related products.

Article Templates

When you create a new article you can create it as a blank article or use a template. Using templates might be a great way to ensure your articles have a consistent layout!

Below you can see that within the Service Management area of the customer service hub I can use the article templates option to create a template.

I can now use the “+ New from Template” option when creating a new article. As I do this a dialog will open and I can select a template.

Cases to knowledge articles

Sometimes it might be useful to create a new article based on an existing case. Doing so will create a draft article that contains key details from the case. If you do this from a resolved case the content of the article will include the resolution comments from the case.

Below you can see that I have opened a resolved case. The “Convert To” option allows me to create a knowledge article.

Having clicked convert to knowledge article, a dialog appears that will allow me to create anm article.

Below you can see my article has been created in draft mode. It will probably need some edits before being ready to publish but hopefully this process could be useful to at least create the outline of an article that can be revised, approved and published.

Configure entities for knowledge management

We do typically think of knowledge management as being something that applies to cases. (As it does out of the box.) But we can actually enable any entity for knowledge management.

Below you can see that within the “Service Management” area of the customer service hub I have opened the settings option. Within the settings option I can enable additional entities for knowledge management.

The article below from Microsoft explains how to add the knowledge control to the forms of any entity you have enabled for knowledge management.

Add the Knowledge Base Search control to Dynamics 365 Customer Service forms | Microsoft Docs

Categories and subjects

Each article has a subject and can also have categories. The subjects are mandatory and come from the subject tree. You can maintain the subject tree from with the service management area of the customer service hub. Out if the box you will have a default subject tree but this can be customized as required to reflect subjects relevant to your organisation.

You may find this article from Microsoft useful when considering maintaining the subject tree;

Create and manage subject tree (Dynamics 365 Customer Service) | Microsoft Docs

We also have categories that can be added to an article. Like subjects they can be maintained in the service management area of the customer service hub. And like subjects we can define a hierarchy of categories.

Unlike subjects, each article can have multiple categories. Below you can see that I have opened an article and navigated to the summary tab. In this tab, using the related information section I can add multiple categories to each article.


Tip: Categories can prove useful if you are using a customer service portal to show articles to your customers. As they can then be grouped by category.

Hopefully this post has given you a flavour of knowledge base articles and I hope I have covered most of the points significant to passing the MB 230 exam. I strongly suggest you experiment with this feature as part of your preparation. I am confident you will uncover even more cool features by getting some essential hands on experience.


D365UG Birmingham Videos

$
0
0

We recorded our recent D365UG Birmingham event. In fact we recorded the one before as well! At these events we had some great presentations. The videos from those presentations are available to watch here ….

The first of four presentations I have uploaded is actually from me! In this video I talk about the customer service workspace and how it compares to other Dynamics 365 apps for customer service.

Next we have a presentation from Ben Warren about The software Bureau’s product to aid data cleaning.

The next presentation is from Benedikt Berghmann, he gives a detailed presentation all about getting started with ALM and Dynamics 365.

And last but by no means least … the final video I’ve uploaded is from Daniel Laskewitz who gives a great presentation all about Power Automate Desktop.

I hope you watch and enjoy all of these videos ….. enjoy.

Omnichannel for Customer Service – Insights Dashboards

$
0
0

Within Omnichannel for Customer Service we can enable Power BI based dashboards to give insights into your customer communications across all your messaging channels. In this post I will review how to enable these dashboards and what information your supervisors will then be able to view.

We actually have two types of supervisor dashboards. The first are the intraday statistics. These are refreshed every 15 minutes and shows a snapshot of KPIs relating to recent conversations. We have two intraday insights dashboards, one shows details for conversation totals across all channels and the other gives information which is agent specific. (The agent dashboard can also allow the supervisor to see the current agent presence and even update it directly from the dashboard.)

We also have additional insights dashboards which give a deeper analysis of conversations over a longer period. In this post I will be describing these “historic” insights dashboards. But you may also benefit from looking into the intraday insights. (I might cover those in more detail in a future post!)

Note: You will need a Power BI Pro license to be able to install the Omnichannel Insights app.

You will find Microsoft’s install instructions and full details of additional prerequisites here.

The install steps are as follows;

  1. Ensure embedding Power BI reports in Dynamics 365 customer service is enabled
  2. Enable sentiment reporting
  3. Install Omnichannel Insights for Dynamics 365 app
  4. Connect to Omnichannel Insights app
  5. Set the refresh frequency on your dataset
  6. Publish your application
  7. Add Power BI dashboards to Omnichannel for Customer Service

Note: There are quite a few steps to the setup process. But stick with it as each step is pretty simple, so you shouldn’t have many problems completing this.

Step One – Ensure embedding Power BI reports in Dynamics 365 customer service is enabled

In the power platform admin center, select your instance and then within the settings option open the “Features” option.

Below you can see that my “Power BI Visualization embedding” setting is enabled.

Step Two – Enable sentiment reporting

You need to ensure that “sentiment drivers reporting” is enabled within Omnichannel.

Before doing this also confirm that change tracking is enabled on the conversation sentiment entity. (Note: Mine was enabled already but it is worth checking!)

Below you can see that on the properties tab for the conversation sentiment entity I have change tracking enabled. Don’t forget that it you change this option you’ll need to publish the change!

Then within the Omnichannel Administration app, open the sentiment analysis settings option. In here you will find an option to “report sentiment drivers in Omnichannel Insights”. You will need to confirm this is enabled.

Step Three – Install Omnichannel Insights for Dynamics 365 app

As an administrator open Power BI. Then use the “Get Data” option to choose the Omnichannel insights app.

Below you can see that I have searched for “Omnichannel”. The Omnichannel insights app has been found and I can select it.

I now open the app and select “GET IT NOW”.

Assuming you are happy to continue that click “Install”

The app will now install. It only takes a few moments!

Once complete you will see the Omnichannel Insights app within Power BI.

Step Four – Connect to Omnichannel Insights app

Now we need to connect the insights app with your Omnichannel for Customer Service instance.

When you first open your Power BI Omnichannel insights app you will see that all the data is blank. Notice the notification which says “You’re viewing this app with sample data”. Click the “connect you data” option next to this message.

Next you enter your Dynamics 365 service root URL and click next.

Tip:
If you don’t know what this URL is check out the customizations option in your advanced settings. And look for the developer resource option as within here you’ll find details about your instance, including this URL.

Next I set my privacy level to “Organizational” and clicked sign in and connect.

Step Five – Set the refresh frequency on your dataset

Your next set will be to set the frequency to refresh your data. This is a simple process which allows us to ensure the data is automatically refreshed daily.

Within Power BI find the datasets option, then on your Omnichannel Insights for Dynamics 365 dataset click “…” and select the settings option.

Within the settings, expand the “schedule refresh” section. And check that the keep you data up to date option is selected and the frequency is set top daily.

Step Six – Publish your application

You must now share the Power BI application with your entire organization, this is required for supervisors to be able to view the Omnichannel Insights dashboards and reports.

Below you can see that I have selected my app workspace. I then click the “Update app” button.

Finally, navigate to the “Permissions” tab and select the “Entire organization” option. Then click update app.

Step Seven – Add Power BI dashboards to Omnichannel for Customer Service

We are now ready to configure Dynamics 365 so that the supervisors can see the Omnichannel insights and sentiment analysis dashboards.

Each supervisor will need to add the sentiment and insights dashboards. Therefore from the dashboards option that will select New and then select Power BI.

Each supervisor can then the omnichannel insights workspace and insights dashboard.

Assuming they require the sentiment dashboard as well as the insights dashboard then they will need to also select the sentiment analysis dashboard.

Once completed the supervisor will have two dashboards that can be selected.

Dashboards

Ok … so now you have two dashboards but what information can you expect to see? In this final section I will describe the key elements of each dashboard. I might not cover everything just the key information!

Obviously the best thing to do is configure the dashboards and see what you actual data look like. But in this section I will try to highlight some of the insights I found most interesting. I will also comment on what actions I completed in my tests to generate this data!

Let’s start by looking at the Insights dashboard ….

Omnichannel Insights for Dynamics 365

The insights dashboard gives you an overview of activity. The top section of the dashboard contains some useful cards that tell me how many conversations have happened etc.

Notice I have 17 incoming conversations but only 16 have been engaged with. This is because I had one conversation that the customer started but no agents accepted.

As Microsoft’s documentation described the abandon rate is the percentage of conversations that are not engaged by agents I was surprised to see that it initially remained at 0%. I did some further tests when I did see the abandon rate change. I think an abandoned conversation is one that is never routed to an agent. Maybe the customer shuts the chat widget almost immediately or maybe no agents are available so the customer aborts before the conversation can be routed. Whereas conversations that are routed but the agents don’t converse with the customer seem to show in the difference between incoming conversations and engaged conversations. But don’t count as abandoned.

I mention abandon rates as in my experience this is a KPI which the supervisors may wish to keep a close eye on. Therefore understanding its meaning maybe important. An increase in customers abandoning conversations before they connect with an agent might suggest you need more agents!

My average wait time was pretty low as generally speaking I connected with each test customer straight away. And being a test system meant I didn’t have a large volume of live customers engaging concurrently!

I did simulate one agent transferring a conversation to another agent. Hence I have a transfer rate.

Below these initial tiles I get a chart showing the number of conversations by day for the last 15 days. Plus charts show the average wait timer per day, average length of conversations and transfer rates per day.

One tip I have here is that you might want to open the dashboard up in Power BI directly. As the date range for these charts could be tweaked. (As shown below.)

I also see a useful chart which gives me an average score from my sentiment analysis. Although if you want to dig deeper into sentiment analysis then the sentiment dashboard will give you more information. (I will mention that later in this post.)

I then get a bunch of charts showing me the conversation stats by channel and queue. I found it especially useful to see how many conversations I’d taken on say Twitter compared to WhatsApp. Etc.

Next I see similar information but by agent. In my test I had just two agents. Me and my dog! But I hope you can see that being able to see how many conversations had been taken by each agent could be really useful.

Tip: One agent handling more conversations than another could in theory flag a management concern. But equally it might be highlighting that due to agent skills based routing and capacity you have a tendency to route conversations to particular agents. So these stats may give you some clues on how your Omnichannel routing can be improved. In my example I found my agent had a much higher capacity than any other agent and therefore the conversations were not routed evenly across my agents.

The final group of charts showed me BOT conversations, including details of resolution rates and escalation rates. I think it would be really useful to understand how many BOT conversations get escalated to humans!

Sentiment Analysis Dashboard

Next I looked at the sentiment analysis dashboard. I found this one really interesting!

The first tile on the sentiment analysis dashboard shows us the average sentiment pulse we saw this on the omnichannel insights dashboard! But we also have a chart showing the sentiment zones, this gives a sense of what percentage of conversations fall into negative, neutral or positive rankings.

This pulse is then further split down by type of agent (aka human or BOT) and channel. For example, In my test data conversations one Twitter seemed to be more positive than live chat.

I only had a couple of test agents but I next see some charts that show me sentiment scores by agent (for the agents obtaining the lowest and highest scores).

Beyond this I see sentiment by queue and also channel (by day).

I hope you agree that enabling these insights is quite straight forward and we can view loads of useful information about our conversation volumes and sentiment. Enjoy.

Dynamics 365 Birmingham – Awesome Free March 2021 Event

$
0
0


With COVID rules looking likely to be relaxed soon maybe just maybe we can start to dream of meeting face to face again soon. But until then we have another awesome free virtual event.

You can register now on meetup using this link …. D365UG Birmingham – Wednesday 17th March 2021 5:30pm | Meetup

This time we have two MVPs presenting. Danial and Benedikt.

Meaning our next exciting Dynamics 365 “Birmingham! User Group meeting will be taking place on Wednesday 17th March 2021 at 5:30pm, and we would love to have you along!

We hope to see our local friends. But being virtual EVERYONE will be very welcome!!

As always our virtual event will start at 5:30pm, so pretty much straight after work. We will also be planning a short meeting, just a one hour session with focused presentations.

Agenda


Session : Getting started with ALM and Dynamics
Speaker : Benedikt Bergmen (MVP)

In this session, we will learn what ALM is and how a basic ALM process for Dynamics could look like. In addition to that, I will bring everyone on the same level of knowledge when it comes to stuff around ALM, like for example tests, Managed/Unmanaged, Update/Upgrade.

We also will have a look at what is possible to make an ALM process more mature.

Session : Power Automate Desktop 101
Speaker : Daniel_Laskewitz (MVP)

In this session, Daniel will show you how you can start your Robotic Process Automation (RPA) journey in Power Automate. What can you use it for? What’s the difference between attended and unattended? Which scenarios are a great fit for RPA? And which aren’t? How does this compare to Digital Process Automation(DPA) or cloud flows? Next to this, Daniel will also talk a bit about the licensing part of it.

After the sessions, we hope you’ll stay with us to socialise and share your anecdotes on what you’ve been up to?

As we socialise you will get chance to question each of the presenters. And also we’d be happy to discuss any of your questions around Dynamics 365 or the Power Platform.

You can register now on meetup using this link …. D365UG Birmingham – Wednesday 17th March 2021 5:30pm | Meetup

I look forward to “seeing” all of you soon ….

MB-230: Microsoft Dynamics 365 Customer Service – Introduction

$
0
0

I am about to commence my revision for the MB-230 exam. This exam is for Microsoft Dynamics 365 and covers all aspects of customer service. As I revise I plan to publish blog posts that collectively will become a complete revision guide for anyone embarking on the same journey as me.

Who should study to MB-230

Anyone who wishes to gain the “Dynamics 365 Customer Service Functional Consultant Associate” badge will need to pass the MB 230 exam. (In addition to the Power Platform Functional Consultant exam, PL-200).

But why would you want to be a “Dynamics 365 Customer Service Functional Consultant Associate”? (Catchy name!!) Well, this badge demonstrates to employers that you have a deep understanding of the Power Platform and also specifically the functionality associated with all things customer service related.

Developers, business analysts, testers and more may find holding this badge beneficial. In fact pretty much anyone involved in the deployment of Dynamics 365 systems for customer service.

Renewals?

If you already have the MB 230 exam but your certificate is due to expire you may be eligible for a renewal! I recently had an email explaining that I needed to renew my “Dynamics 365 Customer Service Functional Consultant Associate” certificate. I’ve shown a copy of the email below, so you know what to look out for!

You will find that the renewal process includes a set of multiple choice questions that can be completed as a “simple” online survey. One major bonus being that I managed to complete this process for no cost.

If you are confident with the Dynamics 365 customer service you may feel able to dive straight in and take this online assessment. I would however suggest you pause and think before jumping in. (I passed my renewal but I honestly wish I hadn’t rushed!!)

You will almost certainly find that the questions will focus on the latest features or areas of the skills measuerd more recently added to the exam. With MB 230 in mind this might include more recently added topics like Omnichannel and more. So if you aren’t familiar with the latest features maybe some revision prior to taking the renewal test will help you??? (And anyway a bit of revision on your favourite subject won’t hurt you!)

What the exam covers

I will give you a break down of the specific skills measured later in this post but initially let’s consider at a high level what knowledge this exam will require you to possess.

Firstly you will need to understand quite a bit around cases. This isn’t a surprise as the case is the primary entity in customer service. You will need to understand everything connected with the management of cases including things like record creation rules, service level agreements, entitlements and much more.

Next you will need to be aware of how creating a knowledge base might help in customer service scenarios.

Queuing work is an important concept in many customer service processes. So you will need to understand how to define queues and how users might interact with queues.

Scheduling work is also a common challenge, so you will obviously need to understand how to define resources and schedule work for them.

Talking with the customer is important! This is where Omnichannel comes into play. Meaning you will need to understand how to define various digital communication channels and how you route the right conversations to the correct agents.

And finally you will need to understand what reporting / analytic capabilities are available to allow organisations to analyse their performance and identify areas which can be improved.

Exam preparation tips

Get a trial… you can sign up for a free 30 day trial at “trials.dynamics.com”. In my opinion having a trial instance to ensure you get plenty of hands on practice is essential. You can learn a lot by reading blogs and documentation about Dynamics 365 and the Power Platform. But when it comes down to it there is no substitute for getting your hands dirty. Use the product as much as possible as part of your revision.

Plan … you may have taken multiple Microsoft certifications before. Maybe you have even taken one of the previous Customer Service certifications. (For example, MB2-718.) This means you may feel you already know many of the skills measured in great detail. But you should still try to plan your revision carefully. Dynamics 365 is a massive product and you may find yourself being tempted into reviewing many topics outside the scope of the MB-230 exam. This is why I always start my revision process by printing off the skills measured statement. I then highlight all of the topics I know I need to review. This process allows me to be clear on what I need to learn. I can create a list of revision topics and tick them off as completed. Meaning I ensure I cover everything required and also I avoid “wasting time” reading irrelevant material.

Don’t rely on one source of information! … Hopefully this series of blog posts will prove useful. But I strongly encourage you to not rely on it! There are many blogs out there which are written by Dynamics 365 fans, Microsoft Certified Trainers and MVPs. Seek out these blogs and read as many as possible. Also, read and re-read as much information as you can from docs.microsoft.com … reading some of the content can occasionally be hard work! But there is no better source for information about Dynamics 365!

https://docs.microsoft.com/en-us/dynamics365/customer-service/

Skills Measured

So, as promised earlier, I have given a breakdown of the skills measured below.

Again I encourage you to look at the Microsoft content! As they do update the skills measured from time to time. And depending on when you are reading this blog post additional items may have been included! Or some old subjects removed.

https://docs.microsoft.com/en-us/learn/certifications/exams/mb-230

Manage cases and Knowledge Management
Create and manage cases· configure cases

· manage case lists

· create and search for case records

· convert activities to cases

· perform case resolution

· implement parent/child cases

· merge cases

· set autonumbering for customer service entities

Configure and automate cases· implement Advanced Similarity rules

· implement record creation and update rules

· implement case routing rules

· customize the Case Resolution form

· configure Status Reason transitions

· configure business process flows

· capture customer feedback by using Customer Voice

Implement Knowledge Management · configure the Knowledge Search control

· link an article with a case

· use Knowledge Management to resolve cases

· manage the Knowledge Management article lifecycle

· manage Knowledge management articles

· configure entities for Knowledge Management

· manage Knowledge article templates

· implement Knowledge Search

· enable Relevance Search

· configure categories and subjects

· convert cases to knowledge articles

Manage queues, entitlements, and service-level agreements
Create and manage queues · describe use cases for each queue type

· configure queues

· add cases and activities to queues

· configure entities for queues

· perform queue operations

Create and manage entitlements · configure entitlements

· define and create entitlements

· manage entitlement templates

· activate and deactivate entitlements

· renew or cancel an entitlement

Create and manage SLAs · define and create service-level agreements (SLAs)

· configure SLA settings

· configure a holiday schedule

· configure a customer service schedule

· implement actions by using Power Automate

· manage cases that are associated with SLAs

· manually apply an SLA

· create and manage SLA items

Implement scheduling
Manage resources · configure business closures

· configure organizational units

· configure resources

· configure work hours

· configure facilities and equipment

Manage Services· define services

· schedule a service activity

· configure fulfilment preferences

· create a schedule board

· schedule a service activity by using the schedule board

Implement Omnichannel for Customer Service
Deploy Omnichannel for Customer Service
· provision Omnichannel for Customer Service

· define user settings

· configure application setting

· manage queues

· configure skills-based routing

Implement Power Virtual Agents
· describe Power Virtual Agents components and concepts

· integrate Power Virtual Agents with Dynamics 365 Customer Service

· escalate conversations to a live agent

Manage channels · describe use cases for the Channel Integration Framework

· configure channels

· enable the chat widget on websites

· configure pre-chat surveys

· configure proactive chat

· configure Secure Message Service (SMS)

Distribute work
· describe difference between entity routing and channel routing

· configure work streams

· configure entity routing

· configure routing values

· implement context variables

Configure the agent experience
· create macros

· define agent scripts

· configure Quick Responses

· configure sessions and applications

· configure notifications

Configure the supervisor experience
· configure Omnichannel Insights dashboard

· configure intraday insights

· customize KPIs for intraday insights

· enable sentiment analysis

Manage analytics
Configure Customer Service Insights· describe capabilities and use cases for Customer Service Insights dashboards

· connect to Customer Service Insights

· manage workspaces

Create and configure visualizations
· configure interactive dashboards

· design and create charts

· design reports by using the Design wizard

Hopefully this post has given you a good over of the MB 230 exam. In future posts I will complete a deep dive into each of the skills measured mentioned above with an aim of creating a pretty comprehensive revision guide.

MB-230: Microsoft Dynamics 365 Customer Service – Customer Service Overview

$
0
0

I am currently revising for the MB-230 exam. This exam is for Microsoft Dynamics 365 and covers all aspects of customer service. As I revise I plan to publish blog posts that collectively will become a complete revision guide for anyone embarking on the same journey as me. In this post I will give an overview of some of the basic concepts we can expect to find in customer service scenarios.

In my opinion, customer service is a critical element of Dynamics 365. I hold this opinion as all good customer relationship management (CRM) systems should include a heavy focus on customer service as they should always put the needs of the customer first. But why is this true?? The answer is simple … giving excellent customer service leads to a happy customer. It should be obvious why we want happy customers! Unhappy customers are not good candidates for repeat business and more importantly they are also likely to become social media detractors. Customers will often publicly comment on the support they receive! I would suggest that it is essential for every business to ensure their customers become fans who are “promoters” rather than “detractors”.

Giving good customer service involves having well defined business processes, excellent information and a consistent repeatable approach. Agents need to gain access to key information in a timely manner and have solutions available to them to quickly respond to customer requests. Dynamics 365 helps companies achieve this critical aim. As you review these revision notes I hope you can clearly see how cases, knowledge base, SLAs, scheduling, omnichannel and much more all come together to provide a set of tools to manage the critical business processes involved in customer service.

You may have seen diagrams similar to the one shown below many times before! It splits the Dynamics 365 into the applications that make up the entire solution. I would suggest that customer service influences most of these modules. However commonly customer service will be directly connected with two applications, those being the “Customer Service” and “Field Service”. The Customer Service application provides facilities such as case management and an integrated knowledge base to handle customer requests. The Field Service application is closely related but has a focus on providing service in the field. Imagine your company supplies air conditioning units. It would be likely that you’d have a number of engineers who would visit customer sites to install, service and repair your air conditioning systems. It is in scenarios like this that the Field Service application comes into play.

The MB 230 exam will have a focus on the core customer service application. We have another exam which specifically covers Field Service scenarios. (MB 240.) Meaning you might need to be aware that the Field Service application exists but I’m not expecting to need to revise any Field Service topics as part of my MB 230 preparation.

It may also be important to remind ourselves that Dynamics 365 is “simply” a set of applications that are built on the Power Platform and make use of the Dataverse. (aka the database behind the Power Platform.)

Power Platform applications are made up of Power BI (Business analytics), Power Apps (application development), Power Automate (process automation) and Power Virtual Agents (intelligent virtual agents). Dynamics 365 Customer service is therefore a model driven Power App that may make use of all of the elements of the Power Platform and you can extend as required using the tools provided within the Power Platform.

This approach creates a powerful and extensible customer service application!

Before “diving into” the specifics of various aspects of the Dynamics 365 Customer Service it’s important to gain an understanding of key service principles, entities and any associated terminology. If you have been working with Dynamics 365 for any length of time these concepts should be pretty familiar but a bit of revision never hurt anyone!

The service module within Dynamics 365 can be used to address multiple customer scenarios. Including customers reporting faults, scheduling service visits or resolving issues. Or alternatively a customer may simply phone for some advice or guidance, in this scenario the use of the knowledge base may be essential. These types of scenario can be supported by business process flows which help guide the operators, ensuring a consistent approach.

It is important to understand the key record types and concepts applicable to servicing with Microsoft Dynamics 365. Some of these are covered at a high level in the table below. The concepts mentioned here will be expanded upon in my future posts.

Term / Record typeDescription
Customer RecordsWhen the term customer is used this can refer to the “contact” or “account” that require service. In several situations you will find one field called “customer” that can link to either a contact or an account.

Note: In the context of service the customer field never links to a Lead.

CasesThe case is the key record type in service management, each case represents a single incident of a service request. (In fact the term incident is often used to refer to a case, you should therefore consider these as interchangeable terms.)

Companies may create cases for a multitude of reason, including handling a complaint, logging a service request or even simply recording the fact that a customer has a question. As we will see in later posts, each case has a status. As cases are progressed they change from an open status to resolved.

Work OrdersLike cases work orders are requests for service. However in Dynamics 365 when we use the term work order we’ll be referring to a service that needs to be completed in the field. (Therefore within the Field Service application.)
ActivitiesInteractions between a business and their customers, typically including phone calls, emails, tasks, letters and appointments.

Although beyond these out of the box activities other bespoke activity types can be created to reflect additional scenarios unique to a particular organization. It will be common for companies to use activities to log all activities with a customer regarding a case.

Resolution ActivitiesResolution activities are a “special” activity type regarding the resolution of cases, these are created when cases are resolved. And can later be used for reporting on service effectiveness.

Note: One case could, in theory, have multiple resolution activities. As it may be resolved, re-opened and resolved again.

PostsCase resolution activities should not be confused with posts!

Posts are another concept which can be used to record key events on a table. In the example of cases this might involve the case being created, resolved and more.

Knowledge Base ArticlesA knowledge base is a repository of informational articles used to help resolve cases. These may be purely used internally by the customer service representatives or also shared externally. By emailing articles to customers or possibly by the article being made public via a customer service portal.
EntitlementsUsed to specify the amount of support services a customer is entitled to, for example a new customer maybe entitled to 8 hours of phone support within the first three months of a contract. Entitlements include “entitlement channels” that further define how much support can be given by specific channels.

Entitlements may also define which service level agreement (SLA) to apply to which customer.

Service Level Agreements (SLA)A service level agreement defines level of service that your organization agrees to offer a customer. This maybe for the time to respond to a service request and / or the time to resolve a request.
QueuesQueues are essentially lists, they offer a place to organize and store activities and cases waiting to be processed.
Subject TreeHierarchical list of subjects an organization can use to classify service cases and other records
Products Products are defined in the product catalogue and can be used to provides a detailed view of service events at a product level

Before we dive deeper, lets quickly look at some key areas that make up the service offerings within Microsoft Dynamics 365;

ItemDescription
Case ManagementAs already mentioned cases are the key entity used for servicing a customer, their basic usage is pretty straight forward but you will need to have an appreciation of several related topics. Including entitlements, service level and agreements.
Knowledge BaseThe knowledge base supports the creation of articles that maybe used to help resolve cases.
Customer Service Hub (CSH)The term customer service hub refers to the Dynamics 365 app used to access all of the key features found in customer service module.

Commonly this will be the app that customer service agents use the most.

Note: If you happen to see the phrase “Interactive Service Hub” (ISH) then this will be referring to a comparable app we found in earlier versions of Dynamics 365.

Customer Service WorkspaceCustomer service workspace is a relatively new customer service app. Like the customer service hub this provides all of the key features needed by customer service agents. But in addition it provides an interface similar to that found in “Omnichannel for Customer Service”. (More on that later!)
Unified Service DeskUnified Service Desk (USD) is a tool which brings together multiple technologies into a single interface. You can use USD to create a “solution” which can help simplify the processes followed within high volume contact centres. (Regular readers of my blog might know I often write about this!)

Note: USD is aimed at scenarios often found in contact centres. Contact centre agents also now have the Omnichannel for customer service app.

Tip: From an MB 230 point of view, you may need to be aware of USD but I have not seen any specific references to USD in the skills measured statement. Therefore I am not expecting any detailed questions around USD.

Omnichannel for Customer ServiceOmnichannel for customer service is an app designed for agents working in a service contact centre. It provides a multi-session / multi-tab interface which with additional productivity enhancements allows agents to quickly handle customer queries.

In addition conversations from digital channels are routed to agents using Omnichannel for Customer Service. These channels can be very varies including web chat, Facebook messenger, Twitter and many more.

As mentioned above “Customer Service Workspace” and “Omnichannel for Customer Service” share the same interface approach.

Field ServiceField Service is an application that helps organizations manage their field engineers. It adds many capabilities including work order creation and management, work order scheduling, mobile access for field agents, inventory management etc.
Reporting / InsightsMicrosoft Dynamics 365 supports an organisations reporting requirements by making use of dashboards, goals and Power BI.
Customer VoiceCustomer surveys are possible using the Customer Voice feature. This can be used to help obtain metrics on customer satisfaction levels following incidents of service.
SchedulingThe customer service app includes the ability to route work to appropriate resources. This concept supports definition of working hours, resource skills and many more concepts all of which work together to create a sophisticated scheduling tool.

The scheduling is completed on a schedule board which gives a rich graphical representation of available agents and assigned “jobs”.

Power Virtual AgentsPower virtual agents can be used in conjunction with Omnichannel for Customer Service. You might use a virtual agent to answer questions from a customer and if / when the virtual agent is unable to assist the customer it can perform a hand off from the virtual agent to a human.

Hopefully this post has given you a very quick introduction into the concepts needed for the customer service certification (MB 230) In later posts we will dive deeper into many of these concepts.


Viewing all 1692 articles
Browse latest View live


<script src="https://jsc.adskeeper.com/r/s/rssing.com.1596347.js" async> </script>